Author: 2x8ma1ja3prb

  • select-filter_react-ts

    Project Banner

    Select Filter – React / TypeScript

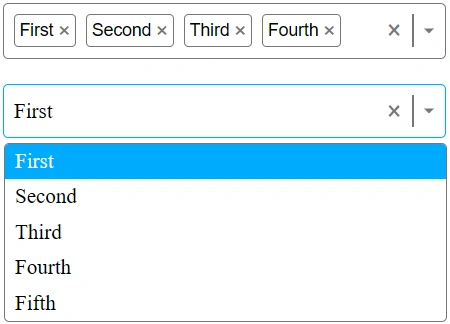
    [EN] Select filter component built from scratch using React and TypeScript, highlighting essential techniques and best practices for creating robust and reusable select components without relying on additional React libraries.

    [FR] Composant filtre/sélecteur construit à partir de zéro en utilisant React et TypeScript, mettant en avant les techniques essentielles et les meilleures pratiques pour créer des composants robustes et réutilisables sans dépendre de bibliothèques React supplémentaires.

    • React is a popular JavaScript library for building user interfaces, particularly single-page applications where data changes over time. React’s component-based architecture allows developers to create reusable UI components, making development more efficient and the codebase easier to maintain.

    • TypeScript is a statically typed superset of JavaScript that allows for early detection of errors and more robust, maintainable code. TypeScript’s type system helps developers catch mistakes early during the development process, ensuring a more stable and reliable application.

    • Vite is a modern front-end build tool that offers a fast and efficient development environment. It leverages ES modules for quick build times and features hot module replacement (HMR) for instant updates, making it ideal for frameworks like React, Vue, and Svelte. Vite’s minimal configuration helps streamline development workflows.

    Follow these steps to set up the project locally on your machine.


    Prerequisites

    Make sure you have the following installed on your machine:


    Cloning the Repository

    git clone {git remote URL}


    Installation

    Let’s install the project dependencies, from your terminal, run:

    npm install
    # or
    yarn install


    Running the Project

    Installation will take a minute or two, but once that’s done, you should be able to run the following command:

    npm run dev
    # or
    yarn dev

    Open http://localhost:5173 in your browser to view the project.

    Visit original content creator repository https://github.com/basedhound/select-filter_react-ts
  • functionfaker

    functionfaker

    Lightweight Decorator to cache (memoize) function calls and replay responses for expensive computations and API requests.

    Pip installable via pip install functionfaker

    Functionfaker offers lightweight and easy to understand function (and method) caching, memoization, similar to some of the functionality of the Joblib package. Function output is recorded once and then replayed from cache from thereon. This facilitates unit testing of applications that involve changing output that needs to be predictable in testing, such as API calls. Testing also often requires API calls to be simulated without actually calling the API. It can also speed up prototyping of computationally expensive code. Functionfaker consists of simple code, and provides a single decorator for your functions and methods, as shown in the following simple example.

    from functionfaker import response_player
    import os
    

    Add the response_player decorator to an example function called add:

    @response_player()
    def add(x, y):
        return x + y
    

    This will not affect the function add until you set an environment variable to RECORD:

    # enter record mode, to record function responses.
    os.environ['RECORD'] = "record"
    

    Call the add function a few times:

    # Clear the stored function responses
    if os.path.exists('responses.p'):
        os.remove('responses.p')
    # call the add function to record some responses.
    add(1,2)
    add(1,y=3)
    add(1,3)
    add(2,1)
    

    Recording response function "add"
    Recording response function "add"
    Recording response function "add"
    

    Set replay mode via the environment variable:

    # enter replay mode, so that function will not run, but return stored values instead.
    os.environ['RECORD'] = "replay"
    

    Call the add function again, with arguments that it has already seen:

    result = add(1,2)
    print("The saved result of adding 1 and 2 using function 'add' is %d"%result)
    

    Faking function "add". Response found
    The saved result of adding 1 and 2 using function 'add' is 3
    

    The outputs for these inputs (1,2) are now read from cache. Setting the environment variable RECORD to and empty string lets the function add run normally again without functionfaker acting on it (you can leave the decorator on).

    Some function arguments might be irrelevant or difficult to serialize. To ignore these arguments, provide the args2ignore argument as a list of integers to the response_player decorator, where the integers represent the index in the argument list.

    Default function response storage is in a simple Pickle file responses.p. To use your own storage system, provide a class derived from BaseStore class with an update and get_response method. An object of this class is then provided as the store argument to the response_player decorator.

    Visit original content creator repository
    https://github.com/wsijp/functionfaker

  • minishell

    OS Language Grade Status

    Minishell

    Minishell is a project from 42 Network. The goal of this project is to create a simple shell, with basic functions.

    How to use

    • Clone the repository with git clone https://github.com/iLucasPires/minishell
    • Run make to compile the project
    • Run ./minishell to start the shell

    Requirements

    • Readline library
    • C compiler (gcc or clang)
    • Make

    Mandatory part

    • The executable must not quit unexpectedly (Segmentation fault, bus error, double free, etc).
    • The executable must respond to the following signals: Ctrl-C, Ctrl-\ and Ctrl-D.
    • You must show a prompt when waiting for a new command.
    • The prompt must be displayed again each time a command has been executed completely.
    • You must correctly handle the PATH and the environment (by copying and restoring the initial envp).
    • You must implement the following builtins: echo, cd, export, unset , env, exit, pwd.
    • You must implement the following redirections: <, >, >>.
    • You must implement the following pipes: |.

    Bonus part

    • You must implement the following logical operators: &&, ||.
    • You must implement the wildcard: *.
    • You must implement the syntax of quotes: ’ and ”.

    Example

    Example

    Example

    TODO

    • better error handling
    • better performance
    • better code documentation
    • improve unit tests
    • improve bonus part
    Visit original content creator repository https://github.com/iLucasPires/minishell
  • react-native-video-processing

    react-native-video-processing

    Build Status semantic-release npm version npm package

    Getting Started

    npm install react-native-video-processing --save
    yarn add react-native-video-processing

    You can check test by running

    $ npm test or $ yarn test

    Installation

    Note: For RN 0.4x use 1.0 version, for RN 0.3x use 0.16

    [Android]

    • Open up android/app/src/main/java/[...]/MainApplication.java

    • Add import com.shahenlibrary.RNVideoProcessingPackage; to the imports at the top of the file

    • Add new new RNVideoProcessingPackage() to the list returned by the getPackages() method

    • Append the following lines to android/settings.gradle:

    include ':react-native-video-processing'
    project(':react-native-video-processing').projectDir = new File(rootProject.projectDir, '../node_modules/react-native-video-processing/android')
    
    • Insert the following lines inside the dependencies block in android/app/build.gradle:
        compile project(':react-native-video-processing')
    
    • Add the following lines to AndroidManifest.xml:
       <uses-permission android:name="android.permission.READ_EXTERNAL_STORAGE" />
       <uses-permission android:name="android.permission.WRITE_EXTERNAL_STORAGE"/>
    

    [iOS]

    1. In Xcode, right click your Xcode project and create New Group called RNVideoProcessing.

    2. Go to node_modules/react-native-video-processing/ios/RNVideoProcessing and drag the .swift files under the group you just created. Press Create folder references option if not pressed.

    3. Repeat steps 1 & 2 for the subdirectories RNVideoTrimmer, RNTrimmerView, and ICGVideoTrimmer and all the files underneath them. Make sure you keep the folders hierarchy the same.

    4. Go to node_modules/react-native-video-processing/ios/GPUImage/framework and drag GPUImage.xcodeproj to your project’s root directory in Xcode.

      Project Structure

    5. Under your project’s Build Phases, make sure the .swift files you added appear under Compile Sources.

    6. Under your project’s General tab, add the following frameworks to Linked Frameworks and Libraries :

    • CoreMedia
    • CoreVideo
    • OpenGLES
    • AVFoundation
    • QuartzCore
    • MobileCoreServices
    • GPUImage
    1. Add GPUImage.frameworkiOS to Embedded Binaries.

    2. Navigate to your project’s bridging header file <ProjectName-Bridging-Header.h> and add #import "RNVideoProcessing.h".

    3. Clean and run your project.

    Check the following video for more setup reference.

    Setup

    Update ffmpeg binaries

    1. Clone mobile-ffmpeg
    2. Setup project, see Prerequisites in README.
    3. Modify build/android-ffmpeg.sh so it generates binaries (more info)
      1. Delete –disable-programs line
      2. Change –disable-static line to –enable-static
      3. Delete –enable-shared line
    4. Compile binaries: ./android.sh --lts --disable-arm-v7a-neon --enable-x264 --enable-gpl --speed. The command might finish with failed. That’s okay because we modified the build script. Make sure every build outputs: ffmpeg: ok.
    5. Find ffmpeg binaries in prebuilt/[android-arm|android-arm64|android-x86|android-x86_64]/ffmpeg/bin/ffmpeg
    6. Copy and rename binaries to android/src/main/jniLibs/[armeabi-v7a|arm64-v8a|x86|x86_64]/libffmpeg.so. Make sure you rename the binaries from ffmpeg to libffmpeg.so!

    Example Usage

    import React, { Component } from 'react';
    import { View } from 'react-native';
    import { VideoPlayer, Trimmer } from 'react-native-video-processing';
    
    class App extends Component {
        trimVideo() {
            const options = {
                startTime: 0,
                endTime: 15,
                quality: VideoPlayer.Constants.quality.QUALITY_1280x720, // iOS only
                saveToCameraRoll: true, // default is false // iOS only
                saveWithCurrentDate: true, // default is false // iOS only
            };
            this.videoPlayerRef.trim(options)
                .then((newSource) => console.log(newSource))
                .catch(console.warn);
        }
    
        compressVideo() {
            const options = {
                width: 720,
                height: 1280,
                bitrateMultiplier: 3,
                saveToCameraRoll: true, // default is false, iOS only
                saveWithCurrentDate: true, // default is false, iOS only
                minimumBitrate: 300000,
                removeAudio: true, // default is false
            };
            this.videoPlayerRef.compress(options)
                .then((newSource) => console.log(newSource))
                .catch(console.warn);
        }
    
        getPreviewImageForSecond(second) {
            const maximumSize = { width: 640, height: 1024 }; // default is { width: 1080, height: 1080 } iOS only
            this.videoPlayerRef.getPreviewForSecond(second, maximumSize) // maximumSize is iOS only
            .then((base64String) => console.log('This is BASE64 of image', base64String))
            .catch(console.warn);
        }
    
        getVideoInfo() {
            this.videoPlayerRef.getVideoInfo()
            .then((info) => console.log(info))
            .catch(console.warn);
        }
    
        render() {
            return (
                <View style={{ flex: 1 }}>
                    <VideoPlayer
                        ref={ref => this.videoPlayerRef = ref}
                        startTime={30}  // seconds
                        endTime={120}   // seconds
                        play={true}     // default false
                        replay={true}   // should player play video again if it's ended
                        rotate={true}   // use this prop to rotate video if it captured in landscape mode iOS only
                        source={'file:///sdcard/DCIM/....'}
                        playerWidth={300} // iOS only
                        playerHeight={500} // iOS only
                        style={{ backgroundColor: 'black' }}
                        resizeMode={VideoPlayer.Constants.resizeMode.CONTAIN}
                        onChange={({ nativeEvent }) => console.log({ nativeEvent })} // get Current time on every second
                    />
                    <Trimmer
                        source={'file:///sdcard/DCIM/....'}
                        height={100}
                        width={300}
                        onTrackerMove={(e) => console.log(e.currentTime)} // iOS only
                        currentTime={this.video.currentTime} // use this prop to set tracker position iOS only
                        themeColor={'white'} // iOS only
                        thumbWidth={30} // iOS only
                        trackerColor={'green'} // iOS only
                        onChange={(e) => console.log(e.startTime, e.endTime)}
                    />
                </View>
            );
        }
    }

    Or you can use ProcessingManager without mounting VideoPlayer component:

    import React, { Component } from 'react';
    import { View } from 'react-native';
    import { ProcessingManager } from 'react-native-video-processing';
    export class App extends Component {
      componentWillMount() {
        const { source } = this.props;
        ProcessingManager.getVideoInfo(source)
          .then(({ duration, size, frameRate, bitrate }) => console.log(duration, size, frameRate, bitrate));
      
        // on iOS it's possible to trim remote files by using remote file as source
        ProcessingManager.trim(source, options) // like VideoPlayer trim options
              .then((data) => console.log(data));
    
        ProcessingManager.compress(source, options) // like VideoPlayer compress options
                  .then((data) => console.log(data));
    
        ProcessingManager.reverse(source) // reverses the source video 
                  .then((data) => console.log(data)); // returns the new file source
    
        ProcessingManager.boomerang(source) // creates a "boomerang" of the surce video (plays forward then plays backwards)
                  .then((data) => console.log(data)); // returns the new file source
    
        const maximumSize = { width: 100, height: 200 };
        ProcessingManager.getPreviewForSecond(source, forSecond, maximumSize)
          .then((data) => console.log(data))
      }
      render() {
        return <View />;
      }
    }

    If this project was helpful to you, please Buy Me A Coffee

    Contributing

    1. Please follow the eslint style guide.
    2. Please commit with $ npm run commit

    Roadmap

    1. Use FFMpeg instead of MP4Parser
    2. Add ability to add GLSL filters
    3. Android should be able to compress video
    4. More processing options
    5. Create native trimmer component for Android
    6. Provide Standalone API
    7. Describe API methods with parameters in README
    Visit original content creator repository https://github.com/shahen94/react-native-video-processing
  • Dickscord

    Dickscord

    Version Documentation Maintenance License: EPL-2.0 Downloads Discord: yo#7800

    BetterHandmadeGull-size_restricted

    Install ✨

    pip install Dickscord==2.1

    Features

    • Colored Text ✅
    • Discord Tools ✅
    • Create Temp Files ✅
    • Do custom prints ✅
    • Discord Tool Support ✅
    • Discord Webhook Options ✅
    • Pc Options ✅
    • Alot Style options ✅
    • Animated text ❌

    You Can also Use like: ->, (#), ($), (-), (!), (~), (/), (*), [+], [-], [>], (>) Everything Shows in different Colours

    Example #1 🔥

    from Dickscord import Style
    
    Style.print(f"(+): Hey this is Dickscord!")

    image

    Available Dickcord Options

    • Fake Typing
    • Nichname Changer
    • Token Activity Setter
    • Channel Spammer / Server Raider
    • Multiple Token Checker
    • Advanced Channel Spammer, (Emojis, Massping, etc..)
    • Webhook Support (advanced)

    Example #2 ⭐


    from Dickscord import Style, Dickcord
    
    Style.input(f"(#): You're about to Check all Tokens in Your tokens file!")
    Dickcord.checktokens('tokens.txt')

    image

    Example #3 🥶

    from Dickscord import *
    
    Dickcord.webhook(
        option="send",
        url="https://discord.com/api/webhooks/1139650309124280460/O4sEWWx111muKs5aZtOMER682F_9y15ReP-_c6RwbA_G1SozgHquS8fBCXHsea1QWVKG",
        avatar="https://media.discordapp.net/attachments/1128099882671030374/1139697612233130014/askim_aka_leyla.jpg?width=361&height=643",
        username="DICKSCORD",
        message="Dickscord is wild"
    )

    image

    Last Example 😣 (u can do alot more)

    from Dickscord import *
    
    Dickcord.webhook(
        option="delete",
        url="https://discord.com/api/webhooks/1139650309124280460/O4sEWWx111muKs5aZtOMER682F_9y15ReP-_c6RwbA_G1SozgHquS8fBCXHsea1QWVKG",
    )

    image

    Visit original content creator repository https://github.com/TheKindDeveloper/Dickscord
  • EasyConnectLibrary

    EasyConnectLibrary

    How to include

    Add the library to your module build.gradle:

    dependencies {
        implementation 'com.easyconnectlibrary.library:easyconnectlibrary:1.0.6'
    }

    Usage

    Connect to Wifi

    WifiConnection wifiConnection = WifiConnection.getInstance(this);
    wifiConnection.registerWifiStatusListener(new WifiConnectionListener() {
        @Override
        public void onWifiStateChanged(boolean isEnabled) {
          /*
          This callback will called whenever Wifi State is changed from ON to OFF or OFF to ON.
          */
        }
    
        @Override
        public void onWifiConnected(String ssid) {
         /*
         This callback will be called when device is connected to mentioned SSID/WIFI.
         */
        }
    
        @Override
        public void onWifiDisconnected(String ssid) {
         /*
         This callback will be called when device is disconnected from mentioned SSID/WIFI.
         */
        }
    
        @Override
        public void onWifiConnecting() {
         /*
          When you call connectToWifi method, the library start establishing connection with mentioned Wifi,
          at that point of time this callback will be called.
          After this callback, other callback namely onWifiConnected,onError or onLocationServiceOff callback 
          will be called base on results.
         */
        }
    
        @Override
        public void onError(WIFI_ERROR wifi_error) {
         //If any error occurs while connecting to WIFI this callback will be called.
        }
    
        @Override
        public void onLocationServiceOff() {
          /*
          In order to connect to wifi, device location service should be ON.
          In case it is not turned on and you are calling connectToWifi method of WifiConnection class,
          this callback will be called.
          */
        }
    });
    wifiConnection.connectToWifi("Your_Wifi_SSID","Your Wifi Password");

    Getting Wifi Scan Results

    WifiConnection wifiConnection = WifiConnection.getInstance(this);
    wifiConnection.registerWifiScanListener(new WifiScanListener() {
        @Override
        public void onWifiScanList(List<ScanResult> scanResultList) {
         /*
           Once you call getWifiScanList method, this callback will be called giving wifi scan result.
         */
        }
    
        @Override
        public void onLocationServiceOff() {
         /*
          In order to get wifi scan result, device location service should be ON.
          In case it is not turned on and you are calling getWifiScanList method of WifiConnection class,
          this callback will be called.
         */
        }
    
        @Override
        public void onError(WIFI_SCAN_ERROR wifi_scan_error) {
         //If any error occurs while getting wifi scan result then this callback will be called.
        }
    });
    wifiConnection.getWifiScanList();

    Connecting to Wifi and Socket Server

    /*
    ...
    ...
    */
    private ClientSocketService mClientSocketService;
    
    @Override
    protected void onCreate(Bundle savedInstanceState) {
        /*
        ...
        ...
        */
        Intent intent=new Intent();
        startService(intent);
        final ClientSocketServiceListener clientSocketServiceListener=new ClientSocketServiceListener() {
            @Override
            public void onConnected(String ssid, String clientIpAddress, int port) {
        
            }
        
            @Override
            public void onWifiConnecting(String ssid) {
        
            }
        
            @Override
            public void onSocketConnecting(String clientIpAddress, int port) {
        
            }
        
            @Override
            public void onDataReceived(ByteBuffer dataBuffer, String data) {
        
            }
        
            @Override
            public void onDisconnected() {
        
            }
        
            @Override
            public void onError(ERRORS socket_error) {
        
            }
        };
        
        ServiceConnection mServiceConnection=new ServiceConnection() {
            @Override
            public void onServiceConnected(ComponentName name, IBinder service) {
                ClientSocketService.ClientSocketServiceBinder myBinder = (ClientSocketService.ClientSocketServiceBinder) service;
                mClientSocketService = myBinder.getService();
                mClientSocketService.registerClientSocketServiceStatus(clientSocketServiceListener);
                
                //Connecting to Wifi and socket running on 192.168.0.11 IP and 8082 port.
                mClientSocketService.connect("MyWifiSSID","Password","192.168.0.11",8082);
            }
        
            @Override
            public void onServiceDisconnected(ComponentName name) {
                mClientSocketService.unRegisterClientSocketServiceStatus();
            }
        };
        bindService(intent,mServiceConnection, BIND_AUTO_CREATE);
    
    }

    Visit original content creator repository
    https://github.com/joyshah/EasyConnectLibrary

  • Thready

    CodeFactor

    Thready

    Thready is a Discord-Bot which can be used to automatically create Threads in configured channels for certain types of messages!

    Do you know this problem? You created a channel for people to post their artwork or memes in and every time someone posts something, it is immediately pushed out of frame by all the messages discussing whatever was posted? Have you tried using a forum-channel instead just to notice that the memes are only smol images on the side of each post?

    Fear not!

    Thready will fix your issues! With a very simple one-time config, you will enable it in any channel you want for any type of message you want and all these problems will be of the past!

    Invite

    You can invite Thready to your server with the minimal set of permissions required using this link: Invite Thready

    Setup

    Simply go to any channel you want to enable Thready in and use the command /config. It will open the configuration-dialogue and allow you to setup Thready however you see fit. Don’t forget to click on “Enable Thready in this Channel” once you’re done!

    Commands

    Thready uses the latest Discord-tech for user-interaction. Therefore, all commands are slash-commands. There are currently these commands to choose from but more will be available as features are added:

    /config – Opens a config-dialogue which lets you set up Thready or change the settings for the channel it was executed in.

    FAQ

    Where can I get support for Thready or suggest features? The easiest way is by clicking on “Issues” up top and create GitHub-issue. If you want to be kept up-to-date about Thready and my other bots, you can also join my Discord Server!

    Why does Thready not work in some channels? Thready needs to be able to see the channels for which it should create threads. Make sure it has permission to see them! It also needs permissions to Create and Manage Threads, so make sure it has these as well. Other than that, it doesn’t need any permissions. If you still need help, feel free to post an issue on GitHub or join my Discord Server!

    What data does Thready store about me or my server? Thready only stores channel-IDs in order to save what config is used for which channel.

    Can I have my data deleted? Of course! Open a new Data Deletion Request by clicking on “Issues” up top! We will try to get to it as quickly as possible and all your data will be deleted completely.

    Planned Features

    See the Issues-page for planned features and to request more or report bugs!

    Visit original content creator repository https://github.com/Ryeera/Thready
  • Thready

    CodeFactor

    Thready

    Thready is a Discord-Bot which can be used to automatically create Threads in configured channels for certain types of messages!

    Do you know this problem? You created a channel for people to post their artwork or memes in and every time someone posts something, it is immediately pushed out of frame by all the messages discussing whatever was posted? Have you tried using a forum-channel instead just to notice that the memes are only smol images on the side of each post?

    Fear not!

    Thready will fix your issues! With a very simple one-time config, you will enable it in any channel you want for any type of message you want and all these problems will be of the past!

    Invite

    You can invite Thready to your server with the minimal set of permissions required using this link: Invite Thready

    Setup

    Simply go to any channel you want to enable Thready in and use the command /config. It will open the configuration-dialogue and allow you to setup Thready however you see fit. Don’t forget to click on “Enable Thready in this Channel” once you’re done!

    Commands

    Thready uses the latest Discord-tech for user-interaction. Therefore, all commands are slash-commands. There are currently these commands to choose from but more will be available as features are added:

    /config – Opens a config-dialogue which lets you set up Thready or change the settings for the channel it was executed in.

    FAQ

    Where can I get support for Thready or suggest features?
    The easiest way is by clicking on “Issues” up top and create GitHub-issue. If you want to be kept up-to-date about Thready and my other bots, you can also join my Discord Server!

    Why does Thready not work in some channels?
    Thready needs to be able to see the channels for which it should create threads. Make sure it has permission to see them! It also needs permissions to Create and Manage Threads, so make sure it has these as well. Other than that, it doesn’t need any permissions. If you still need help, feel free to post an issue on GitHub or join my Discord Server!

    What data does Thready store about me or my server?
    Thready only stores channel-IDs in order to save what config is used for which channel.

    Can I have my data deleted?
    Of course! Open a new Data Deletion Request by clicking on “Issues” up top! We will try to get to it as quickly as possible and all your data will be deleted completely.

    Planned Features

    See the Issues-page for planned features and to request more or report bugs!

    Visit original content creator repository
    https://github.com/Ryeera/Thready

  • hpack-template

    hpack-template

    A stack template for an executable, libary, and test-suite using hpack‘s
    package.yaml.

    The test-suite is built using tasty and uses HUnit for unit tests and
    hedgehog for property tests. GitHub Actions are included to build the project
    with the latest Stackage LTS, Stackage Nightly, & the last 3 version of GHC.

    To start a new project with this template, run:

    stack new <project-name> https://raw.githubusercontent.com/prikhi/hpack-template/master/hpack.hsfiles

    The hpack-lib.hsfiles is similar but geared towards libraries instead of
    applications. It does not include an executable section, modifies the compiler
    flags to support GHC versions under 8.0, lower the bounds of the base
    package, includes the base-compat-batteries package to reduce the CPP
    macros necesary for supporting multiple GHC versions, & uses GitHub Actions to
    test multiple Stackage LTSes and GHC versions.

    stack new <project-name> https://raw.githubusercontent.com/prikhi/hpack-template/master/hpack-lib.hsfiles

    Generation

    The *.hsfiles are generated with
    stack-templatizer using the
    files in the hpack & hpack-lib directories.

    Install the templatizer with stack install --resolver nightly stack-templatizer, then run stack-templatizer hpack & stack-templatizer hpack-lib to regenerate the template files.

    LICENSE

    BSD-3

    Visit original content creator repository
    https://github.com/prikhi/hpack-template

  • lqip

    Visit original content creator repository
    https://github.com/mole-inc/lqip