Category: Blog

  • ELO-Rating

    ELO-Rating

    It is an excellent method for calculating relative skill levels of players represented as numeric values.

    Understanding ELO

    • Consider a PvP match b/w two players, player A and player B.
    • Player A has ELO rating $R_a$ and player B has ELO rating $R_b$.
    • ELO ratings of individual players reflect their relative skill levels based on performance in past matches.
    • Now, a player defeating a much weaker player is not the same as defeating a much more stronger player. ELO rating takes this into account and is reflected in updated ratings of both players.
    • After each match, ELO rating of both players is updated based on a formula.
    • Originally, it only considers the outcome of a match.

    Formula to calculate New Rating of a Player

    $$
    R^{‘}_a = R_a + K \times (S_a – E_a)
    $$

    where,

    $R^{‘}_a: \text{New Rating of player A}$

    $R_a: \text{Original Rating of player A}$

    $K\ : \text{Scaling factor}$

    $S_a: \text{Actual score or outcome of the match}$

    $E_a: \text{Expected score or outcome of the match}$

    Scaling Factor: $K$

    • It determines how much influence each match can have on the ELO ratings of the players.
    • It can be varied according to matches, leagues, competitions, player rating levels, etc.
    • Generally, can be set to $32$.

    Actual score: $S_a$

    • Represents whether a player won or lost or drawn the match.
    • Generally, it takes one of the three values:
      • $1$ for a win
      • $0$ for a loss
      • $0.5$ for a draw
      • i.e. $S_{a} \in [0, 1]$

    Expected score: $E_a$

    • This is where magic of ELO ratings happen.
    • It represents the probability that the player will win a match.
    • It is calculated based on ELO ratings of two players.
    • Formula:

    $$
    E_a = \frac{Q_a}{Q_a + Q_b}
    \text{, where}
    \begin{cases}
    Q_a = 10 ^ {R_a / c} \\
    Q_b = 10 ^ {R_b / c} \\
    c = 400 \text{ (generally)}
    \end{cases}
    $$

    On solving by substituting values of $Q_a$ and $Q_b$,

    $$
    E_a = \frac{1}{1 + 10 ^ {\frac{R_b – R_a}{c}}} \text{, where } c = 400
    $$

    $\therefore E_a \in [0, 1]$

    • As $0 \leq S_a \leq 1$ and $0 \leq E_a \leq 1$, maximum change in a player’s rating can be $K$.

    Initial ELO Rating

    • It is the rating that a new player has when he starts playing the game.
    • It must be significantly larger than $K$ factor, to allow a player to play, and lose enough matches before eventually winning matches, so that his ELO rating would finally start rising up.
    • Generally, can be set to $1000$.

    Considering Points scored by players

    But, why?

    • Consider a game, where the only thing which matters is not just the outcome of game, i.e. win or loss.
    • Let’s say:
      • In 1st game, player A won over player B by 5-1 score.
      • In second game player C won over player B by 2-1 score.
    • In this scenario, player A had a much more dominant win than player C.
    • Thus, player A much have a better rating inrease than player C.

    Method 0

    • In this, we are considering the effect of points scored by individual players on the change in rating.
    • We only consider the fact whether the player has won or lost or drawn the match.
    • This is same as original ELO Rating.

    Method 1

    • We replace $S_a$ with the fraction of points scored by player A divided by total score.
    • i.e.,

    $$
    S_a = \frac{P_a}{P_a + P_b}
    $$

    where,

    $P_a: \text{Points scored by player A}$

    $P_b: \text{Points scored by player B}$

    • This is more intuitive and we don’t need to update the main rating change formula.
    • But, it gives less control and predictability on the rating change.

    Method 2

    • In this, we keep $S_a$ same as outcome of match, i.e., $S_a \in$ { $0, 0.5, 1$ }.
    • And we extend rating update formula with another scaling factor to which acts as a bonus for the amount of scored points.
    • New Formula:

    $$
    R^{‘}_a = R_a + K \times (S_a – E_a) + p \times L \times \left( \frac{P_a}{P_a + P_b} \right)
    $$

    where,

    $L: \text{Second scaling factor}$

    $$
    p =
    \begin{cases}
    1 & \quad \text{if } S_a – E_a \gt 0 \\
    -1 & \quad \text{if } S_a – E_a \lt 0 \\
    0 & \quad \text{otherwise}
    \end{cases}$$

    $$p = \frac{S_a – E_a}{|S_a – E_a|}$$

    • $L$ can be set to 16, and can be varied as well.
    • This method is less intuitive, but gives much more control and predictability of the ratings.
    • Using this, maximal change that a rating can have is $K + L$.

    Implementation

    • I have implemented all of the above formulas in ELO class in Python and Java.

    Class ELO

    • It has a constructor and two public methods.
      • constructor(): To create an instance of class ELO
      • elo(): It can be called after a match with ratings of both players and match result. It returns the updated ratings of the players.
      • elo_with_points(): It is similar to elo(), but this is with consideration of points scored by the two players.

    Constructor

    • It takes 3 arguments:
      1. k_factor: Value of $K$ factor. (int, default $32$)
      2. c_value: Value of $c$ number. (int, default $400$)
      3. l_factor: Value of $L$ factor. (int, default $16$)
    • Constructor instantiates an object of ELO class with given parameters.
    • In practice, it can be called multiple times for different leagues, arenas, matches, championships, competitions, etc.

    elo() method

    • This is the rating update function which only considers the outcome of a match.
    • It takes 4 arguments:
      1. rating_a: Current rating of player A. (float)
      2. rating_b: Current rating of player B. (float)
      3. outcome: Outcome of a match. (int)
    • outcome must $\in$ {0, 1, 2} where,
      • outcome = 0 $\implies$ Match is drawn
      • outcome = 1 $\implies$ Player A won the match
      • outcome = 2 $\implies$ Player B won the match
    • It returns the new ratings of the players in the form of tuple/array of float point numbers. e.g. (1400.0, 1550.0)
    • It must be called after a match with the required parameters to get the new ratings of the players.

    elo_with_points() method

    • This is the rating update formula which takes into consideration the individual points scored by the players.
    • It takes 5 arguments:
      1. rating_a: Current rating of player A. (float)
      2. rating_b: Current rating of player B. (float)
      3. points_a: Points scored by player A. (float)
      4. points_b: Points scored by player B. (float)
      5. method: Method to use for consideration of points scored. (int, default 2)
    • method must $\in$ {0, 1, 2} where,
      • method = 0 $\implies$ Just consider the outcome of a match.
      • method = 1 $\implies$ Consider fraction of points at the place of $S_a$.
      • method = 2 $\implies$ Uses the L factor for consideration of points.
    • It returns the new ratings of the players in the form of tuple/array of float point numbers. e.g. (1400.0, 1550.0)
    • It must be called after a match with the required parameters to get the new ratings of the players.

    Dependencies

    • Python: No extra libraries used.
    • Java: No extra libraries used.

    Files

    1. ELO.py: Python implementation of ELO class.
    2. ELO.java: Java implementation of ELO class.

    Visit original content creator repository
    https://github.com/Kunal-Attri/ELO-Rating

  • yara-parser

    yara-parser

    yara-parser is a Go library for manipulating YARA rulesets. Its key feature is that it uses the same grammar and lexer files as the original libyara to ensure that lexing and parsing work exactly like YARA. The grammar and lexer files have been modified to fill Go data structures for ruleset manipulation instead of compiling rulesets for data matching.

    Using yara-parser, one will be able to read YARA rulesets to programatically change metadata, rule names, rule modifiers, tags, strings, and more.

    The ability to serialize rulesets to JSON for rule manipulation in other languages is provided with the y2j tool. Similarly, j2y provides JSON-to-YARA conversion, but do see Limitations below.

    Installation

    For the following go get commands, if you experience any issues, they are likely due to outdated versions of Go. The project uses features introduced in Go 1.10. Installation should proceed normally after an update.

    To install (or update) everything at once, the following command can be used:

    go get -u github.com/Northern-Lights/yara-parser/...

    y2j: YARA to JSON

    Use the following command to install the y2j command for converting YARA rulesets to JSON.

    go get -u github.com/Northern-Lights/yara-parser/cmd/y2j

    Of course, this will install y2j to $GOPATH/bin, so ensure that the latter is in your $PATH.

    The grammar and lexer files are frozen so that building them with goyacc and flexgo are not necessary.

    j2y: JSON to YARA

    Use the following command to install the j2y command for converting JSON to YARA rulesets.

    go get -u github.com/Northern-Lights/yara-parser/cmd/j2y

    Grammar Library

    Use the following command to install the grammar library for deserializing YARA rulesets without installing y2j.

    go get -u github.com/Northern-Lights/yara-parser/grammar

    y2j Usage

    Command line usage for y2j looks like the following:

    $ y2j --help            
    Usage of y2j: y2j [options] file.yar
    
    options:
      -indent int
            Set number of indent spaces (default 2)
      -o string               
            JSON output file
    

    In action, y2j would convert the following ruleset:

    import "pe"
    import "cuckoo"
    
    include "other.yar"
    
    global rule demo : tag1 {
    meta:
        description = "This is a demo rule"
        version = 1
        production = false
        description = "because we can"
    strings:
        $string = "this is a string" nocase wide
        $regex = /this is a regex/i ascii fullword
        $hex = { 01 23 45 67 89 ab cd ef [0-5] ?1 ?2 ?3 }
    condition:
        $string or $regex or $hex
    }

    to this JSON output:

    {
       "file": "sample.yar",
       "imports": [
          "pe",
          "cuckoo"
       ],
       "includes": [
          "other.yar"
       ],
       "rules": [
          {
             "modifiers": {
                "global": true,
                "private": false
             },
             "identifier": "demo",
             "tags": [
                "tag1"
             ],
             "meta": [
                {
                   "Key": "description",
                   "Val": "This is a demo rule"
                },
                {
                   "Key": "version",
                   "Val": 1
                },
                {
                   "Key": "production",
                   "Val": false
                },
                {
                   "Key": "description",
                   "Val": "because we can"
                }
             ],
             "strings": [
                {
                   "id": "$string",
                   "type": 0,
                   "text": "this is a string",
                   "modifiers": {
                      "nocase": true,
                      "ascii": false,
                      "wide": true,
                      "fullword": false,
    		  "xor": false,
                      "i": false,
                      "s": false
                   }
                },
                {
                   "id": "$regex",
                   "type": 2,
                   "text": "this is a regex",
                   "modifiers": {
                      "nocase": false,
                      "ascii": true,
                      "wide": false,
                      "fullword": true,
    		  "xor": false,
                      "i": true,
                      "s": false
                   }
                },
                {
                   "id": "$hex",
                   "type": 1,
                   "text": " 01 23 45 67 89 ab cd ef [0-5] ?1 ?2 ?3 ",
                   "modifiers": {
                      "nocase": false,
                      "ascii": false,
                      "wide": false,
                      "fullword": false,
    		  "xor": false,
                      "i": false,
                      "s": false
                   }
                }
             ],
             "condition": "$string or $regex or $hex"
          }
       ]
    }

    Note that the string types are as follows:

    String type int code Designation
    0 string
    1 hex pair bytes
    2 regex

    Go Usage

    Sample usage for working with rulesets in Go looks like the following:

    package main
    
    import (
    	"fmt"
    	"log"
    	"os"
    
    	"github.com/Northern-Lights/yara-parser/grammar"
    )
    
    func main() {
    	input, err := os.Open(os.Args[1])   // Single argument: path to your file
    	if err != nil {
    		log.Fatalf("Error: %s\n", err)
    	}
    
    	ruleset, err := grammar.Parse(input, os.Stdout)
    	if err != nil {
    		log.Fatalf(`Parsing failed: "%s"`, err)
    	}
    
        fmt.Printf("Ruleset:\n%v\n", ruleset)
        
        // Manipulate the first rule
        rule := ruleset.Rules[0]
        rule.Identifier = "new_rule_name"
        rule.Modifiers.Global = true
        rule.Modifiers.Private = false
    }

    Development

    The included Dockerfile will build an image suitable for producing the parser and lexer using goyacc and flexgo. There is a builder target in the Makefile to help you quickly get started with this. Run the following to build the builder image:

    make builder

    This will provide you with a Docker image called yara-parser-builder.

    As you make changes to the grammar, you can then run make grammar. The .go files will be output in the grammar/ directory.

    Limitations

    Currently, there are no guarantees with the library that modified rules will serialize back into a valid YARA ruleset. For example, you can set rule.Identifier = "123", but this would be invalid YARA. Additionally, adding or removing strings may cause a condition to become invalid, and conditions are currently treated only as text. Comments also cannot be retained.

    Visit original content creator repository
    https://github.com/Northern-Lights/yara-parser

  • Esp32_SinricPro_FritzDect_Controller

    Esp32_SinricPro_FritzDect_Controller

    Switching and monitoring of the switch states of a switchable Fritz!Dect 200 power socket ( for FritzBox ) via Sinric Pro

    This is a simple and quite easy to understand appliction providing only switching of the socket.

    A more complex application which can be used to switch the power socket and read the power consumption is provided here:

    https://github.com/RoSchmi/Esp32_SinricPro_FritzDect_Switch_PowerReader

    What is Sinric Pro?

    Sinric Pro is an internet based ecosystem mainly consisting of an internet portal, a cloud service, mobile Apps and SDKs to run connected applications on different microcontrollers and mini computers (like Esp32, Arduino, Raspberry Pi) Smart home systems like Alexa or Google Home can be integrated.

    What is FritzBox and Fritz!Dect 200 switchable power socket?

    Fritz!Dect 200 is a switchable power socket, which can be switched remotely through radio transmission of the DECT telefone system integrated in FritzBox devices. FritzBox devices, produced by the german company AVM, are mostly combinations of Internet Router (WLAN and Ethernet) with a DECT telefone system. ‘FritzBox’es are very popular in Germany.

    This App accomplishes a way to switch the power socket remotely over the internet from a Sinric Pro Phone App via the Sinric Pro cloud service and the FritzBox (Router/DECT-Phone combination).

    Before you can start:

    Define WiFi-Credentials, FritzBox-Credentials and Sinric Pro Credentials in the file include/config_secrete.h (take ‘config_secret_template.h’ as a template)

    Define ‘TRANSPORT_PROTOCOL’ (http or https) in file config.h When you begin to work with this App set TRANSPORT_PROTOCOL = 0 (http) The https secured connection will not work before you include the specific certificate of your personal FritzBox in include/config.h. Instructions how to get the certificate are given in the file ‘config.h’ When you have included the correct certificate, set TRANSPORT_PROTOCOL = 1 More configurations can be made in config.h (details are explained in config.h).

    The FRITZ_DEVICE_AIN can be found on your Fritz!Dect 200 powersocket.

    To get the Sinric Pro Credentials have a look at:

    https://sinric.pro/de-index.html

    https://sinricpro.github.io/esp8266-esp32-sdk/index.html

    https://github.com/sinricpro

    Visit original content creator repository
    https://github.com/RoSchmi/Esp32_SinricPro_FritzDect_Controller

  • kotlin-logging-opentracing-decorator-example

    Earthquake API – Example app using kotlin-logging-opentracing-decorator

    Example Ktor application instrumented with OpenTracing using ktor-opentracing, using kotlin-logging for logging and kotlin-logging-opentracing-decorator to write logs to spans.

    Retrieves data about earthquakes that happened today using an API from the U.S. Geological Survey.

    Running

    1. Start an all-in-one Jaeger backend with in-memory storage.

       docker run -d --name jaeger \
         -e COLLECTOR_ZIPKIN_HTTP_PORT=9411 \
         -p 5775:5775/udp \
         -p 6831:6831/udp \
         -p 6832:6832/udp \
         -p 5778:5778 \
         -p 16686:16686 \
         -p 14268:14268 \
         -p 14250:14250 \
         -p 9411:9411 \
         jaegertracing/all-in-one:1.20
      
    2. Start the application.

       ./gradlew run
      
    3. Send some requests. Other routes available are /earthquake/biggest and /earthquake/biggerthan/5 (where 5 is a parameter).

       curl localhost:8080/earthquake/latest
       {
         "location" : "21 km SSE of Karluk, Alaska",
         "magnitude" : 1.9,
         "timeGMT" : "2020-11-02 09:46:39"
       }  
      
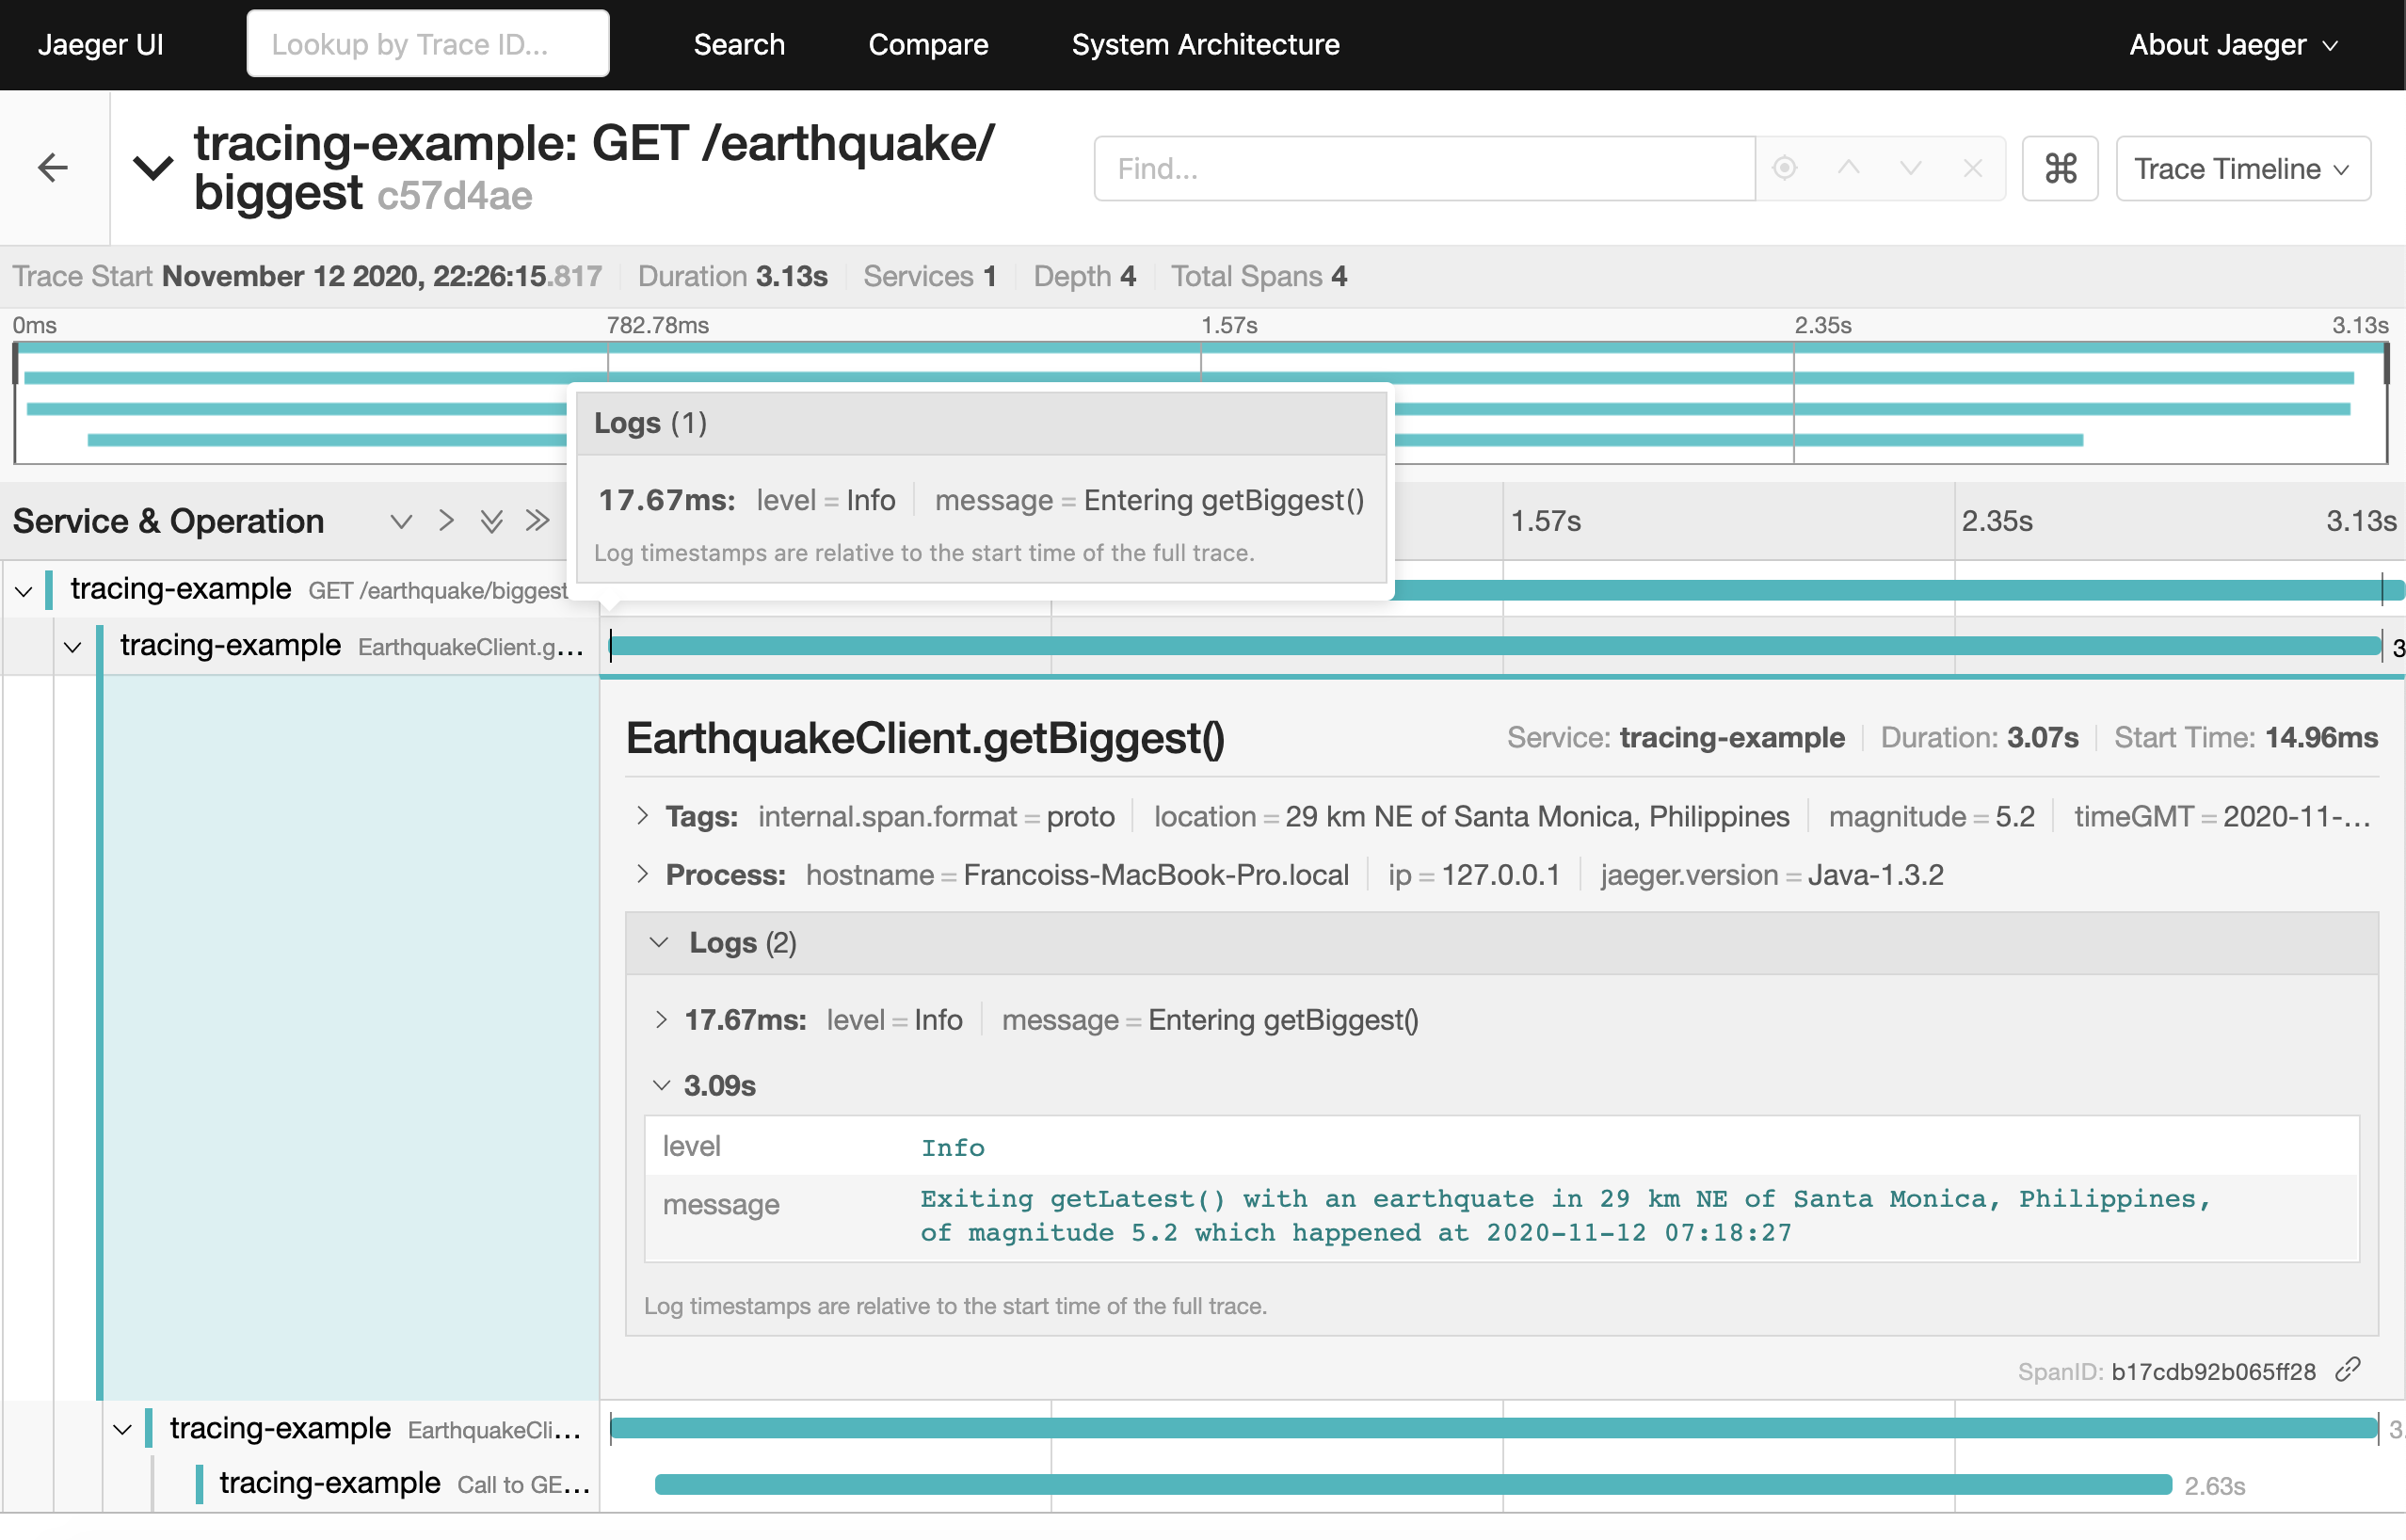
    4. See traces in Jaeger.

      http://localhost:16686/

    Trace Screenshot

    1. Stop the Jaeger docker container.

       docker ps
       docker stop <containerId>
      

    Steps

    1. Import the kotlin-logging-opentracing-decorator dependency. (Commit).

      implementation 'com.github.fstien:kotlin-logging-opentracing-decorator:0.1.0'
      
    2. Call the withOpenTracingLogs extension function on your loggers. (Commit).

      val logger = KotlinLogging.logger {}.withOpenTracingLogs()
    Visit original content creator repository https://github.com/fstien/kotlin-logging-opentracing-decorator-example
  • blogging-platform

    Blogging Platform

    About App

    Blogging Platform is one of my latest, most complex & advanced responsive full-stack single-page application. It supports all kinds of CRUD features, in which I have used all of my previous knowledge and skills in the field of:

    • front-end development (React, Bootstrap)
    • back-end development
      • dynamic & nested routing (React Router)
      • realtime database integration (Firebase)
      • database architecture
      • security rules
    • app structure
      • Atomic Web Design pattern

    Blogging Platform allows you to:

    Recently the app was updated and rewritten (basically from scratch) and adapted to:

    • new app structure according to Atomic Web Design pattern (so now code is split, and components are reused more efficiently)
    • new, more flatten realtime database structure (so now the app downloads up to 10 times less data & does it when necessary)
    • new security rules (so now the app is protected from malicious users, and that’s very hard to download big portions of data, for example it’s impossible to download the whole database)

    Technologies used in the project

    • React 17
    • React Context
    • React Router 5.2 (dynamic & nested routing)
    • React Markdown 7 & remark-gfm
    • Firebase 9.1 (authentication, realtime database, security rules)
    • Bootstrap 5.1
    • Bootswatch 5.1
    • GitHub Pages 3.2
    • Atomic Web Design pattern

    Visit original content creator repository
    https://github.com/vadimgierko/blogging-platform

  • vault-express

    vault-express project – ALPHA stage

    A simply secure sign-up/sign-in implementation for web app. You may consider this as runnable guideline for your implementation.

    LIVE DEMO

    Gitter Chat

    This project demonstrates the secure web app by using 3 public web pages and 1 protected user profile page

    Public pages

    • /landing
    • /signup
    • /signin

    Protected page

    • /secure/profile

    Why?

    After I went through for many programming tutorials, I thought It was time to create some web app myself.

    The first thing in my head was “What should I create?” (the big question in my life) and then the next question was “Which framework should I use for frontend, backend and database?” and then again and again many questions pop into.

    But a big common question for most web application that is “How can I secure the content inside my app?”

    Sound easy at first for newbie as me, just create a page for sign-in. BUT the truth never be easy like that.

    I did search for this topic and found scattered information spreads all over internet. Those infomation will give me wrinkles, I don’t want to be an expert on this topic, I just want to create an app with acceptable secure.

    Then I create this project with hope that opensource community will help me out, as always. and also to help people with the same situation as me to solve this issue.

    Features

    • A secure Sign-up/Sign-in implementation
    • Validate input on Client side
    • Validate input on Server side
    • Detect && Protect abnormal usage ???
    • Security logging
    • Detect/Protect DoS attack ???
    • Protect Cross-site Scripting (XSS)
    • Protect SQL injection
    • EU’s General Data Protection Regulation Compliance ??? (trying to achieve)

    Getting Started

    These instructions will get you a copy of the project up and running on your local machine for development and testing purposes. See deployment for notes on how to deploy the project on a live system.

    Prerequisites

    If you just want to check this project out, you don’t need anything special; just Git, npm and Node.js.

    Anyway, if you want to see how we implement DB-tier, You gonna need to install PostgreSQL or MongoDB. Check Deployment for more info

    Installing

    git clone https://github.com/VaultExpress/vault-express.git
    
    cd vault-express
    
    npm install
    

    We use .env file for setting environment variables which you can see what we use in .env-example For quick start you may

    cp .env-example .env
    

    and then you can start the server by

    npm start
    

    Running the tests

    npm test
    

    Deployment

    Coming soon…

    Built With

    • Express.js – Fast, unopinionated, minimalist web framework for Node.js
    • Helmet – Helmet helps you secure your Express apps by setting various HTTP headers
    • Passport – Simple, unobtrusive authentication for Node.js

    Contributing

    Please read CONTRIBUTING.md for details on our code of conduct, and the process for submitting pull requests to us.

    Versioning

    We use SemVer for versioning. For the versions available, see the tags on this repository.

    Contributors

    See also the list of contributors who participated in this project.

    License

    This project is licensed under the MIT License – see the LICENSE file for details

    Acknowledgments

    Visit original content creator repository https://github.com/VaultExpress/vault-express
  • 21sh

    21sh

    Project from UNIX branch in school 42

    Project 21sh is the continuation of the project minishell

    New in 21sh project

    Mandatory implementations

    [✓] Pipes ‘|

    [✓] The 4 following redirections ‘<‘, ‘>‘, ‘<<‘ and ‘>>

    [✓] File descriptor aggregation ‘<&‘ and ‘>&

    [✓] Basic line editing features using termcap library

    Bonuses

    [✓] Implementation of Hash Table for binary files, also the hash builtin command

    [✓] Advanced auto completion using tab

    [✓] Search through history using ctrl+R

    [✓] Some other line editing features (see below)

    Hotkey list for line editing:

    Key Details
    Left move cursor backward by one character
    Right move cursor forward by one character
    Up List term history up
    Down List term history down
    Ctrl + Left ⌃← move cursor backward by one word
    Ctrl + Right ⌃→ move cursor forward by one word
    Ctrl + Up ⌃↑ move cursor backward by one row
    Ctrl + Down ⌃↓ move cursor forward by one row
    Ctrl + Shift + Left ⌃⇧← delete the word in front of the cursor
    Ctrl + Shift + Right ⌃⇧→ delete the word after the cursor
    Ctrl + Shift + Up ⌃⇧↑ delete the row in front of the cursor
    Ctrl + Shift + Down ⌃⇧↓ delete the row after the cursor
    Return Confirm line entry
    Backspace delete one previous character from current position of cursor
    Delete delete one character from current position of cursor
    Home move cursor to the beginning of the line
    End move cursor to the end of the line
    Tab Auto compilation
    Ctrl + R ⌃R Search history
    Ctrl + A ⌃A work same as Home
    Ctrl + E ⌃E work same as End
    Ctrl + U ⌃U clear all characters in front the cursor
    Ctrl + K ⌃K clear all characters after the cursor
    Ctrl + G ⌃G clear all characters in line
    Ctrl + H ⌃H Undo the last change
    Ctrl + L ⌃L clear screen

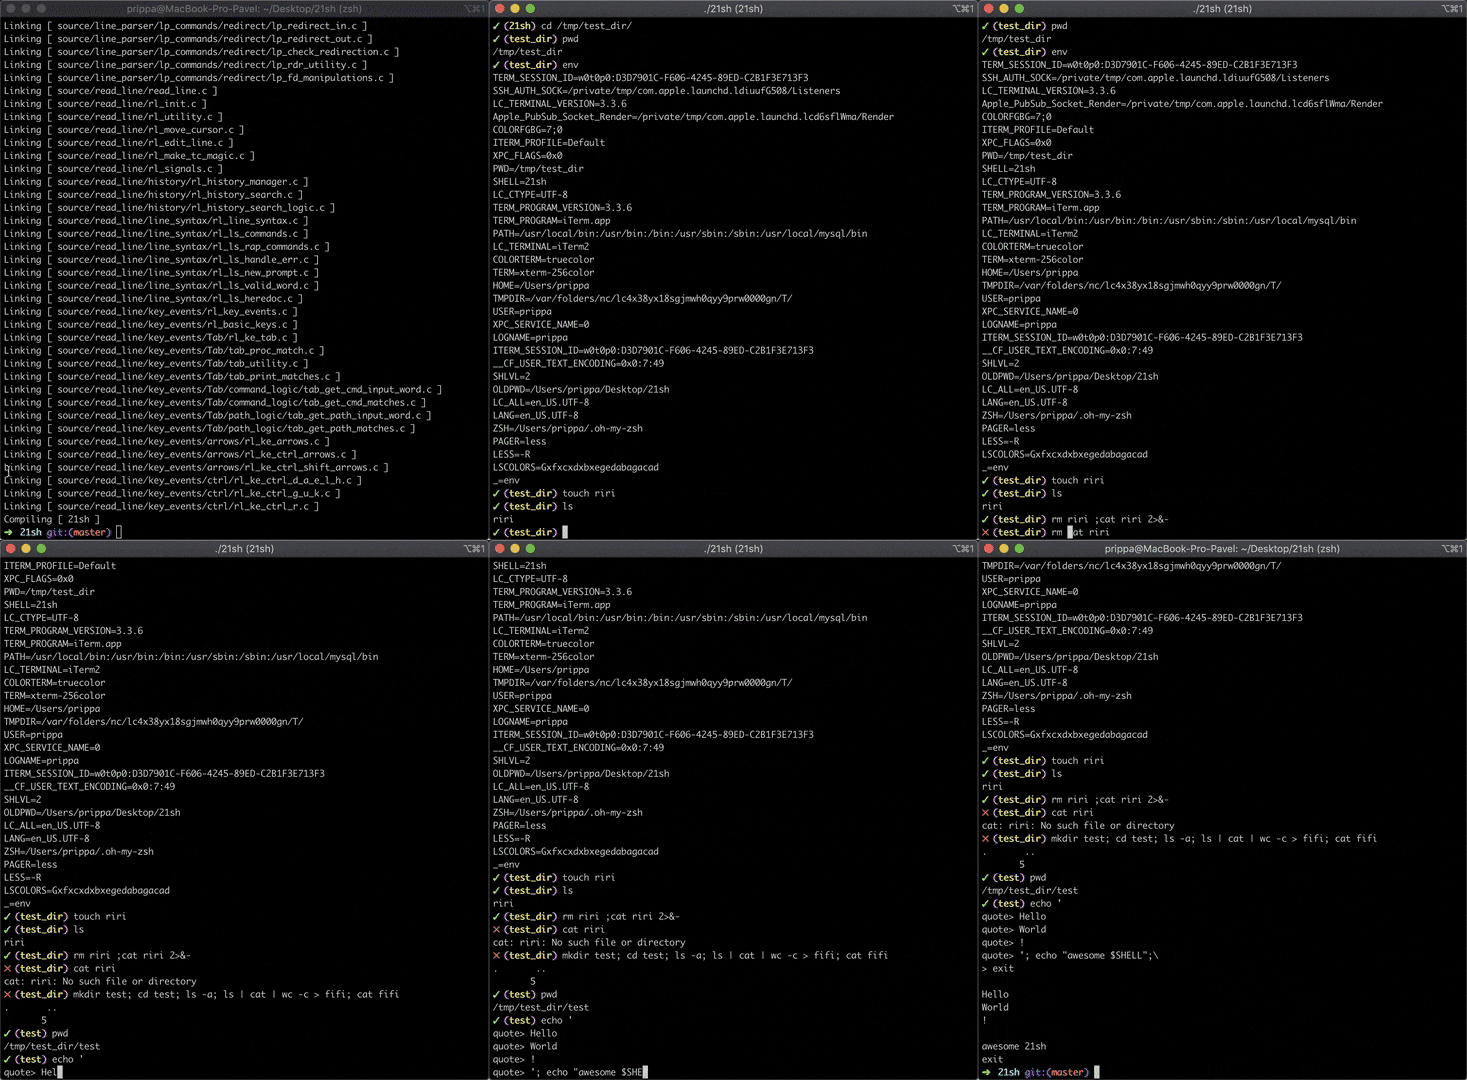
    Preview

    Preview output

    ➜  21sh git:(master) ./21sh
    ✓ (21sh) cd /tmp/test_dir/
    ✓ (test_dir) pwd
    /tmp/test_dir
    ✓ (test_dir) env
    TERM_SESSION_ID=w0t0p0:D3D7901C-F606-4245-89ED-C2B1F3E713F3
    SSH_AUTH_SOCK=/private/tmp/com.apple.launchd.ldiuufG508/Listeners
    LC_TERMINAL_VERSION=3.3.6
    Apple_PubSub_Socket_Render=/private/tmp/com.apple.launchd.lcd6sflWma/Render
    COLORFGBG=7;0
    ITERM_PROFILE=Default
    XPC_FLAGS=0x0
    PWD=/tmp/test_dir
    SHELL=21sh
    LC_CTYPE=UTF-8
    TERM_PROGRAM_VERSION=3.3.6
    TERM_PROGRAM=iTerm.app
    PATH=/usr/local/bin:/usr/bin:/bin:/usr/sbin:/sbin:/usr/local/mysql/bin
    LC_TERMINAL=iTerm2
    COLORTERM=truecolor
    TERM=xterm-256color
    HOME=/Users/prippa
    TMPDIR=/var/folders/nc/lc4x38yx18sgjmwh0qyy9prw0000gn/T/
    USER=prippa
    XPC_SERVICE_NAME=0
    LOGNAME=prippa
    ITERM_SESSION_ID=w0t0p0:D3D7901C-F606-4245-89ED-C2B1F3E713F3
    __CF_USER_TEXT_ENCODING=0x0:7:49
    SHLVL=2
    OLDPWD=/Users/prippa/Desktop/21sh
    LC_ALL=en_US.UTF-8
    LANG=en_US.UTF-8
    ZSH=/Users/prippa/.oh-my-zsh
    PAGER=less
    LESS=-R
    LSCOLORS=Gxfxcxdxbxegedabagacad
    _=env
    ✓ (test_dir) touch riri
    ✓ (test_dir) ls
    riri
    ✓ (test_dir) rm riri ;cat riri 2>&-
    ✕ (test_dir) cat riri
    cat: riri: No such file or directory
    ✕ (test_dir) mkdir test; cd test; ls -a; ls | cat | wc -c > fifi; cat fifi
    .	..
           5
    ✓ (test) pwd
    /tmp/test_dir/test
    ✓ (test) echo '
    quote> Hello
    quote> World
    quote> !
    quote> '; echo "awesome $SHELL";\
    > exit
    
    Hello
    World
    !
    
    awesome 21sh
    exit
    ➜  21sh git:(master)
    

    more info

    Visit original content creator repository https://github.com/prippa/21sh
  • Multiple-Object-Tracking

    Multi Object Tracking

    • Track just about anything that detectors can detect

    • Currently its using yolov5 for detections and Deepsort with Siamese Network for tracking

    • Siamese Network is trained on Nvidia AI City Challege Data (640 epochs) and VeRI Wild Dataset (33 epochs) pretrainied weights are provided

    • This Project is built on top of https://github.com/abhyantrika/nanonets_object_tracking and adds detector and capabilities to inference on video/live_feed

    • Currently feature extracter is trained to extract features for vehicals but can be easily trained for other task also

    Demo Video


    Steps to run tracker on custom Video

    Training steps

    • Download dataset and save it in object_tracking/datasets/train and object_tracking/datasets/test (make sure format of data is correct i.e train/car_id/**images)
    • change default config
    • python siamese_train.py

    Get Test Scores

    • python siamese_test.py

    Limitations

    • Beaware this dose not reid the object with same id if its out of frame for long interval of time

    Refrences

    Visit original content creator repository https://github.com/ls-da3m0ns/Multiple-Object-Tracking
  • php-blog-system

    PHP Blog System

    PHP-based Blogging Platform Web Application built with PHP and MySQL. The system allows users to create accounts, authenticate, manage their profiles, and post blog content. Admin have additional control over user management. Key features include account activation, password recovery, and a user-friendly post management system.

    Screenshoots

    Main Page

    Simple-Blog-03-06-2025_05_31_PM

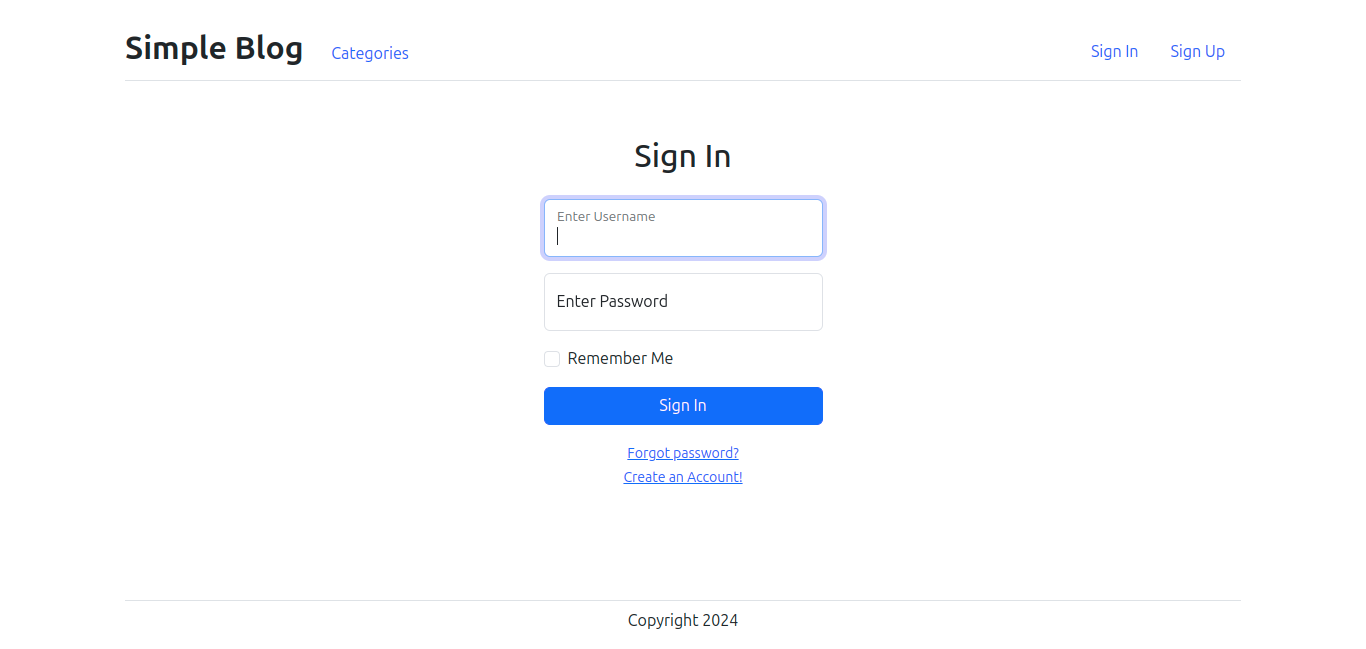
    Login Page

    Simple-Blog-03-08-2025_02_44_PM

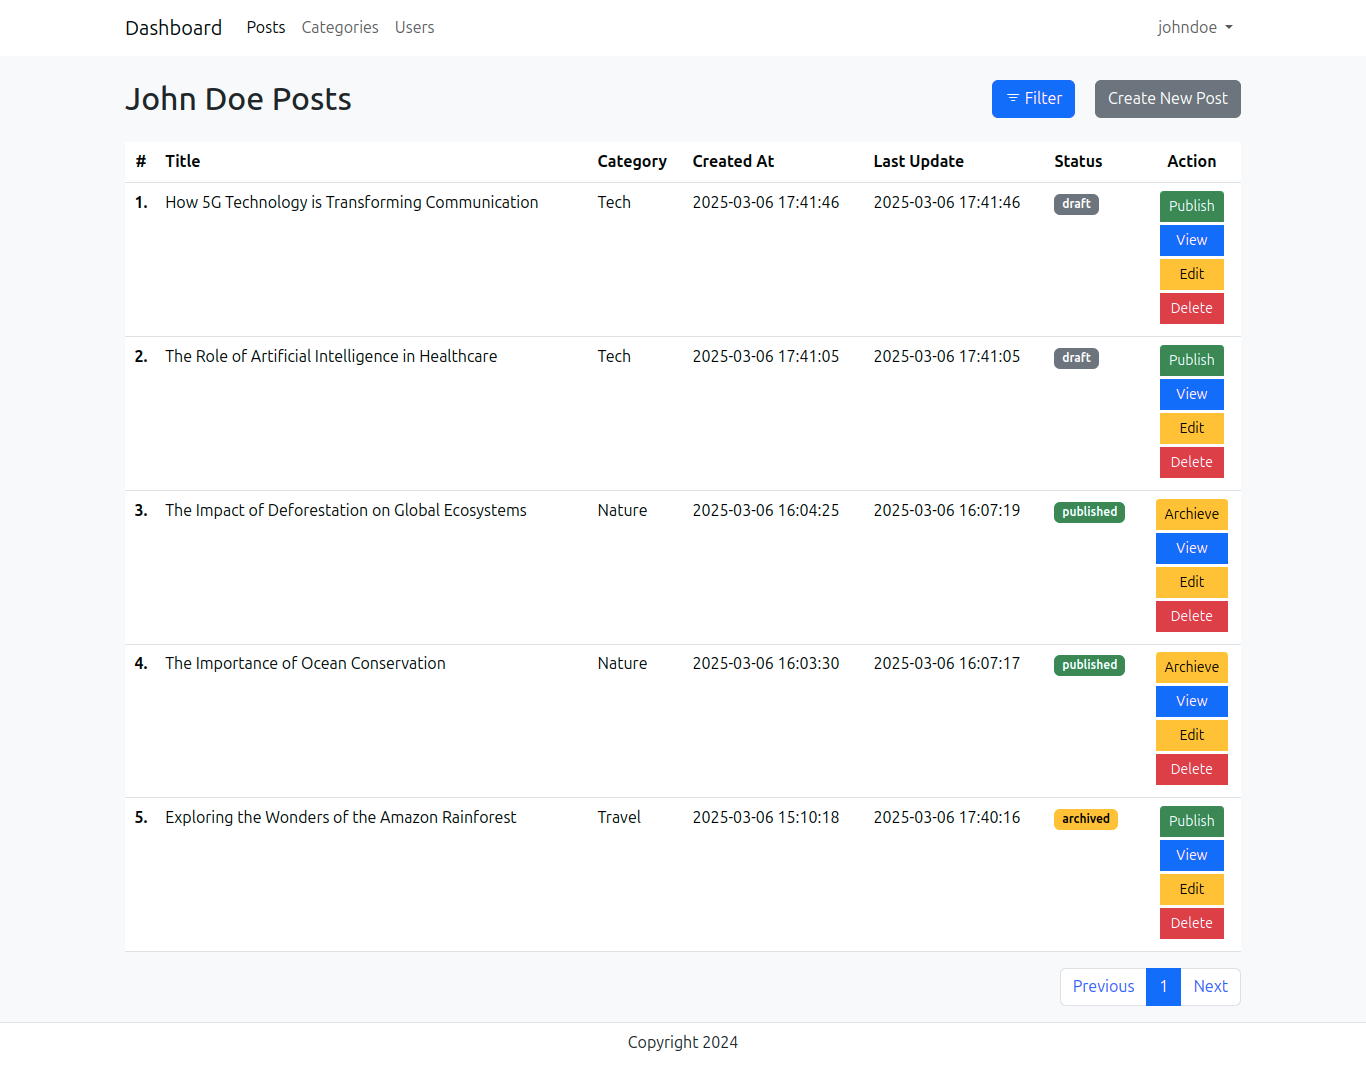
    Dashboard Page

    Simple-Blog-Dashboard-03-06-2025_05_42_PM

    Features

    • User Authentication: Secure login and registration with password hashing.
    • Account Activation: Email-based account verification.
    • Password Recovery: Reset forgotten passwords via email.
    • User Management: Admin can manage user accounts; users can manage their own profiles.
    • Blog Post Management: Create, edit, and delete blog posts.
    • Categories: Organize posts with categories.
    • Search: Search posts by keywords and categories.
    • Pagination: Navigate through posts.
    • User Roles: Different roles with specific permissions.

    Technologies

    • PHP (for backend development)
    • MySQL (for database management)
    • HTML/CSS (for frontend design)
    • JavaScript (for client-side interactions)
    • Bootstrap 5 (for CSS framework)

    Setup

    1. Clone the repository:

      git clone https://github.com/krisnaajiep/php-blog-system.git
    2. Navigate to the project directory:

      cd php-blog-system
    3. Move the project files to the XAMPP htdocs directory (usually located in C:\xampp\htdocs on Windows or /Applications/XAMPP/htdocs on macOS):

      mv php-blog-system /path-to-xampp/htdocs/
    4. Create new database

      mysql -u root -p -e "CREATE DATABASE simple_project_blog_system;"
    5. Import simple_project_blog_system.sql file

      mysql -u root -p simple_project_blog_system < config/simple_project_blog_system.sql
    6. Configure the database, base url, and base directory settings in config/config.php.

    7. Start XAMPP Control Panel and launch the Apache and MySQL services.

    8. Access the application at http://localhost/php-blog-system (adjust the URL if your project is in a subfolder within htdocs).

    Visit original content creator repository https://github.com/krisnaajiep/php-blog-system
  • synnet

    Sistema Synnet

    O sistema encontra-se em constante desenvolvimento e atualização e pode ser ofereçido como serviço na web ou instalado localmente em um servidor web.
    A seguir segue um resumo das principais funcionalidades já desenvolvidas e em estágio de desenvolvimento.

    • Painel de Controle com estatísticas em tempo real.

    • Administração

      • Cobrança
        • Cartas de Cobrança via email e correio tradicional (SPC, Jurídico, primeiro aviso, segundo aviso, etc..)
      • Contas
        • Entradas (Cadastro e Contas Atrasadas)
        • Saídas (Cadastro, Contas Atrasadas, Contas Essenciais e Contas por Fornecedores)
        • Bancos (Conta Corrente, Conta Poupança e Conta Cobrança para Emissão de Boletos)
        • Centro de Custo
        • Fluxo de Caixa e Conciliação Bancária
      • Empresa
        • Dados da Empresa
          • Cadastro da Empresa
          • Administração dos Dados de Cadastro da Empresa
        • Sede da Empresa
          • Cadastro de Sede da Empresa
          • Administração dos Dados de Cadastro da Sede da Empresa
        • Setor
          • Cadastro de Setor
          • Administração dos Dados do Setor
        • Cargo
          • Cadastro de Cargo
          • Administração de Dados de Cargos
        • Fiscal
          • Dados de Clientes (Exportar PF e PJ)
          • Dados de Produtos (Exportar)
          • Dados NFSC Mod. 21 (Gerador dos Arquivos e Consulta das NFSC já Geradas – arquivo tem limite de 990 item por doc fiscal, inicio em .001)
          • Dados NF-e (Gerador e Consulta)
          • Dados NFS-e (Gerador e Consulta via API da eNotas Gateway)
      • Gestão de Clientes
        • Cadastro de clientes.
        • Consulta e Administração Geral de Clientes.
        • Ativação e Desativação de Clientes.
        • Central do Cliente. (Area dedicada ao acesso do cliente)
        • Gerar segunda via de boletos
        • Visualizar histórico financeiro
        • Solicitar alteração de dados cadastrais
        • Multiplos Contratos
        • Google Maps com a localização do endereço de instalação do contrato do cliente.
      • Gestão de Fornecedores
        • Cadastro de Fornecedores
        • Adminstração de Fornecedores
      • Gestão de Funcionários
        • Cadastro de Funcionários
        • Adminstração de Funcionários
      • Gestão de Veículos
        • Cadastro de Veículos
        • Adminstração de Veículos
      • Central de Revendas
        • Cadastrar Revendedores
        • Revendedor tem acesso único a central de revendas, controlando seus proprios clientes.
      • Cadastro de Serviços e Planos
        • Cadastro de Serviços
        • Cadastro de perfil de plano (categoria)
        • cadastro de planos
        • Administração de Serviços e Planos
    • Operacional

      • Suporte
      • Agenda
        • Crie entradas na agenda toda vez que uma nova ordem de serviço for criada.
      • Ordem de Serviço
        • Abertura de chamados de ordem pelo cliente via Central do Cliente ou via telefone.
        • Impressão de ordem de serviço para o técnico
      • Orçamento
      • Tools
        • Endereço de Instalação de Contratos mostrados no google mapas.
      • Equipamento
        • Cadastro de Equip.
        • Administração de Equip.
        • Consulta de Transceptor
        • Administração de Equip. na Oficina
      • Estação
        • Cadastro de Estação
        • Administração de Estação
      • Torre
        • Cadastro de Torre
        • Administração de Torre
      • Transceptor
        • Cadastro de Transceptor
        • Administração de Transceptor
        • Indexar Transceptor com Torre
      • Servidor
        • Tipo de Servidor
          • Cadastro e Administração
        • Servidor
          • Cadastro e Administração
        • Range de IP
          • Cadastro e Administração
        • Servidor BFW (v2)
          • Cadastro e Administração de White List
        • Servidor BFW (v3)
          • Cadastro e Administração do SQUID(prebloqueio)
          • Cadastro e Administração QoS
          • Cadastro e Administração Reserve
        • Servidor BFW (Execuções: Gerar, Mover e Recarregar Arquivos)
        • Servidor Mikrotik (API)
    • Inventário

      • Estoque
        • Entrada
        • Sada
        • Consulta por Local
        • Transferência de Estoque de um local para outro
        • Depósito
          • Cadastrar
          • Consultar
      • Produto
        • Consultar
      • Pedidos
    • Usuário e Grupos

      • Grupos de Acesso
        • Cadastrar
        • Administrar
        • Consultar
        • Atribuir Grupos a Usuários
      • Usuários
        • Senhas
        • Contas Bancárias (Usado com a Folha de Pagamento de Funcionários)
      • Perfil do Usuário (Funcionário)
      • Bloqueio de Tela (Desbloqueio com Senha)
    • Relatórios

      • Rentabilidade

      • Financeiro

      • Ganhos

      • Comissões

      • Bloqueios

        • por Cliente
        • por parte da Empresa
          • Pré-Bloqueio
          • Bloqueio
          • Bloqueio automático de clientes inadimplentes.
          • Desbloqueio automático baseado na baixa de pagamentos via boleto (pendente automatizar a baixa de pagtos via cartão).
      • Contratos

      • Estoque

      • Ordem de Serviço

      • Pedidos

      • Estatísticas

      • Contas Bancárias

      • Logs

      • ANATEL (Relatório SICI – Sistema de Coleta de Informações)

    • Configurações

      • Painel de Controle
      • Tarefas Agendadas
      • Atividade de Conta
      • Meus Logs do Sistema
      • Informaçes do Servidor
      • Servidor Radius
      • Backup
        • backup automatico do banco de dados (via cronjobs)
    • Auto Ajuda

      • F.A.Q.
      • Material de Apoio (Videos)
    • Meios de Pagamento (implica custo extra)

      • Boleto Bancário via homologação direto com o Banco (Homologamos por R$ 1200,00)
      • Boletos via Gateways (Homologamos qualquer API por R$ 1200,00)
      • Homologação de Cartão de Crédito via Cielo (Homologamos por R$ 1200,00)
    • Mais Informações

      • Clientes ilimitados
      • Rádios e RB ilimitados.
      • Importamos o seu banco de dados por R$ 900,00
    • Ambiente de Instalação

      • Servidor Linux Debian 8 x64 (Jessie) ou superior, PHP versão 5.3+, MySQL 5.5+ ou MariaDB, Python 2.7+, Nginx 1.10+ ou Apache 2.2.2+
      • Versao Legacy funciona nas versoes: PHP<=5.2.x, PHP>5.6.x

    Para doações por favor enviar:

    • Monero: 4828JWzwtXtMYesdzsGv3WEgFobS9VPTyd6rpo86eMrCa9P7A8RXcKjHDoEjhHFRW27tAZMd7ks2dW76wnxsZs6DNmmBQue

    IMPORTANTE A versão de código aberto disponível neste repositório refere-se ao código refatorado da versão Legacy, alguns recursos da versão Legacy não estarão disponíveis nesta versão de código aberto. Para mais informações sobre a versão Legacy, envie-me um e-mail.

    Visit original content creator repository
    https://github.com/devasia2112/synnet