The English version was stemmed by nltk stemmer namly PorterStemmer
tag all verses discussing a specific concept by a tag, then search by tag to get all these verses.
almost manually, firstly by names. For example, if the verse contains “messiah”, “son of mary” or “jesus” it will be tagged by “jesus”.
another approach is to look up (either by graping a quran or otherwise) what verses are discussing Moses stories (for example), note them and then tag them.
The Data
There are 2 data files, one is the arabic Quran
and the other one is an English translated version of the Quran.
each data file has three important features:
1- The number of the chapter (Surah).
2- The number of the verse (Ayah) within the chapter.
3- the verse either in Arabic or in english.
dara sources
The Arabic Data:
Tanzil Quran Text (Simple, Version 1.1)
Copyright (C) 2007-2022 Tanzil Project
License: Creative Commons Attribution 3.0
This copy of the Quran text is carefully produced, highly
verified and continuously monitored by a group of specialists
at Tanzil Project.
Please check updates at: http://tanzil.net/updates/
Report the number of particles in each class from a run_data.star file
produced by RELION.
A single-particle cryo-EM reconstruction comes from a set of particle images
corresponding to projections of identical particles in different orientations.
All datasets are heterogeneous, to various degrees, and data analysis involves
classification of particle images. Knowing how many particles contributed to
any given class is important to decide how to follow up after a classification
job. This command-line tool reports a count of particles in each class in a
run_it???_data.star file from a RELION Class2D or Class3D job. It can also
optionally produce a bar plot of these particle counts.
This tool was tested with star files produced by RELION-3.1.0. Earlier versions
of RELION are not supported.
Acknowledgments
I would not have been able to put this tool together without the
starfile library.
Installation
I recommend to install this tool in a dedicated conda environment. You can
create one like so (replace ENV_NAME with the name you want to give to this
environment):
Once the conda environment is active, you can install the tool with the
following command:
$ pip install countparticles
Usage
$ countparticles --help
Usage: countparticles [OPTIONS] <run_data.star>

  Report the number of particles in each class from a run_data.star file
  produced by RELION.

Options:
  -p, --plot         Optional. Display a bar plot of the particle counts. This
                     is most helpful with only a few classes, e.g. for typical
                     Class3D results (but not for typical Class2D results with
                     many classes).

  -o, --output TEXT  Optional. File name to save the barplot (recommended file
                     formats: .png, .pdf, .svg or any format supported by
                     matplotlib). This option has no effect without the
                     -p/--plot option.

  -h, --help         Show this message and exit.
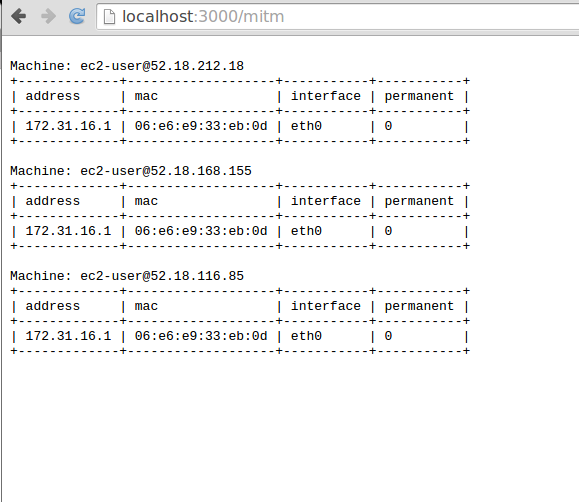
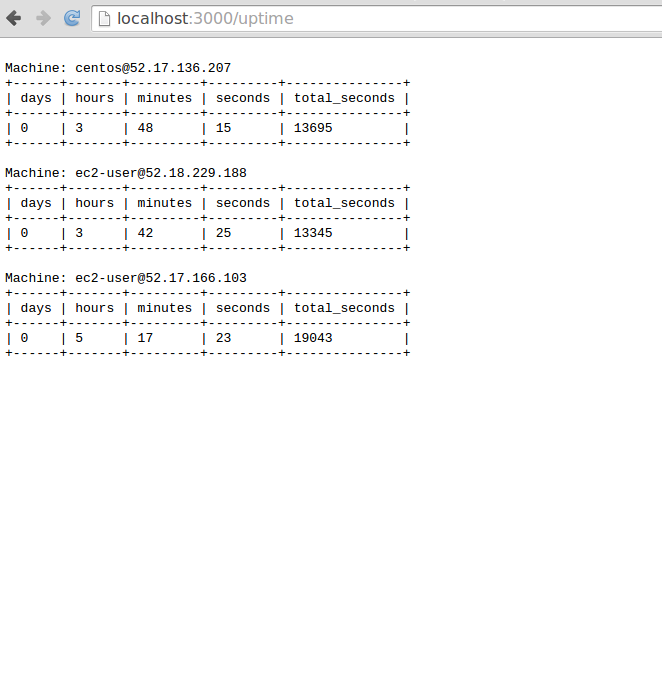
This is a tiny app i made, that you would run locally on your workstation and it will dispatch osquery queries to the machines under your command.
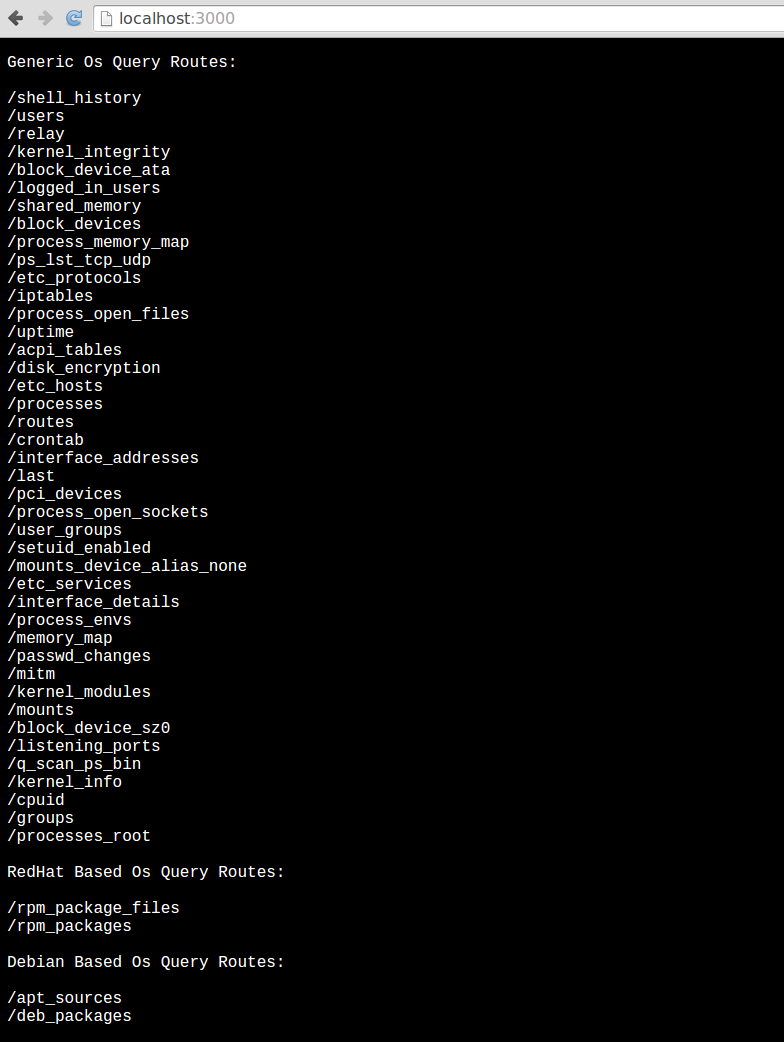
The commands are listed in the main root route of the app so you don’t need to dig deep. And i really like osquery project, if you have never checked it out, you should probably take a look.
Requirement
The only requirement is that your target machines should have osquery installed on them, thats it..
Install
Standart Procedure
go get github.com/emirozer/exposq
Lets assume you are going to run exposq from your home directory(/home/user/).
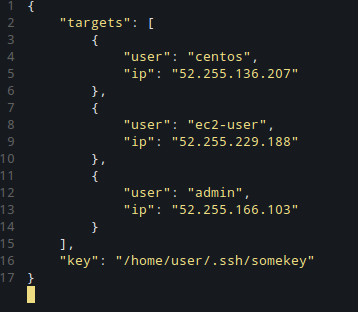
After running the command above, you need to create a file called targets.json in your /home/user/
Example formatting of targets.json file:
Important Notes : It expects a private key and you can give a key file specific to a target like the following json structure
장애 전파 방지 – 주문 서비스가 동작한다면 결제 서비스에서 일시적으로 장애가 발생하더라도 복구가 되었을 때 주문 및 결제가 성공합니다.
확장 가능성 – 주문 이벤트를 발행하기만 하면 컨슈머가 자유롭게 이벤트를 소비하고, 컨슈머를 확장할 수 있어 기능 확장에 유리합니다.
위 이점을 최대한 활용할 수 있도록 고려하며 이벤트 기반으로 주문 결제 기능을 구현하였습니다.
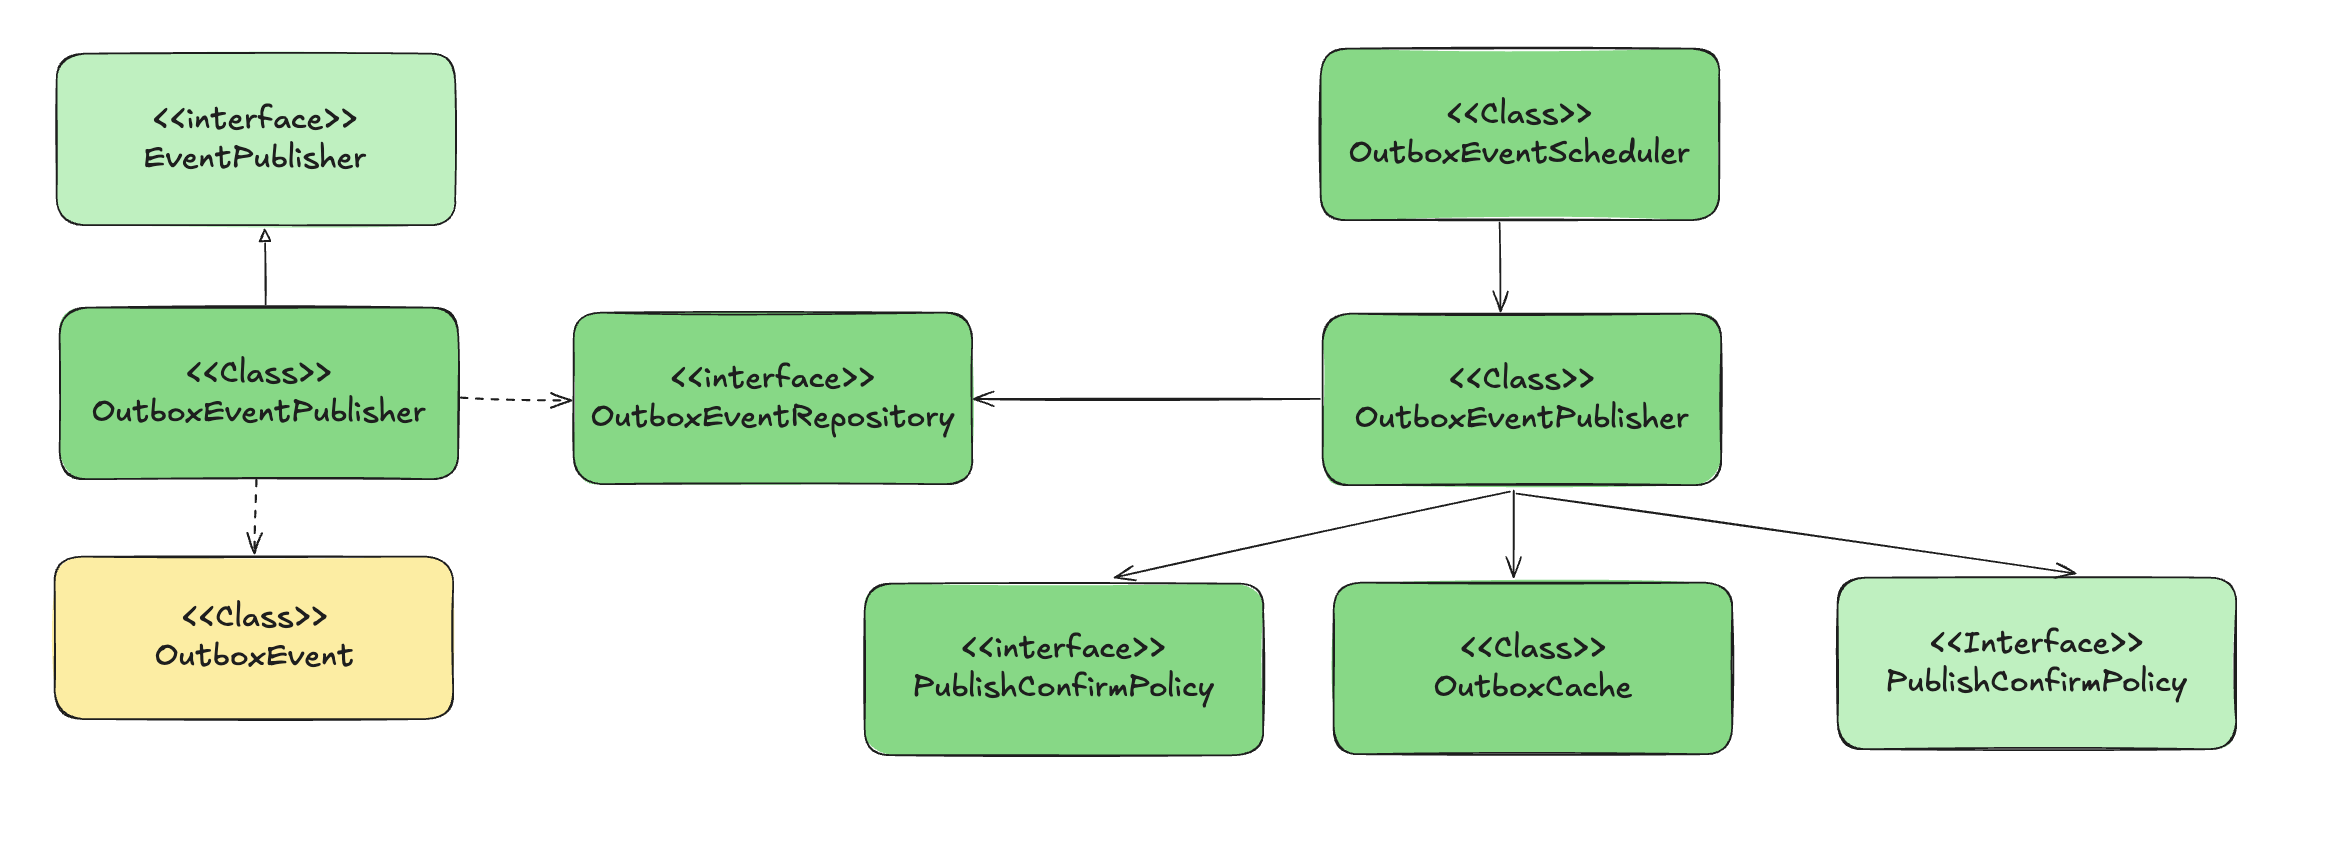
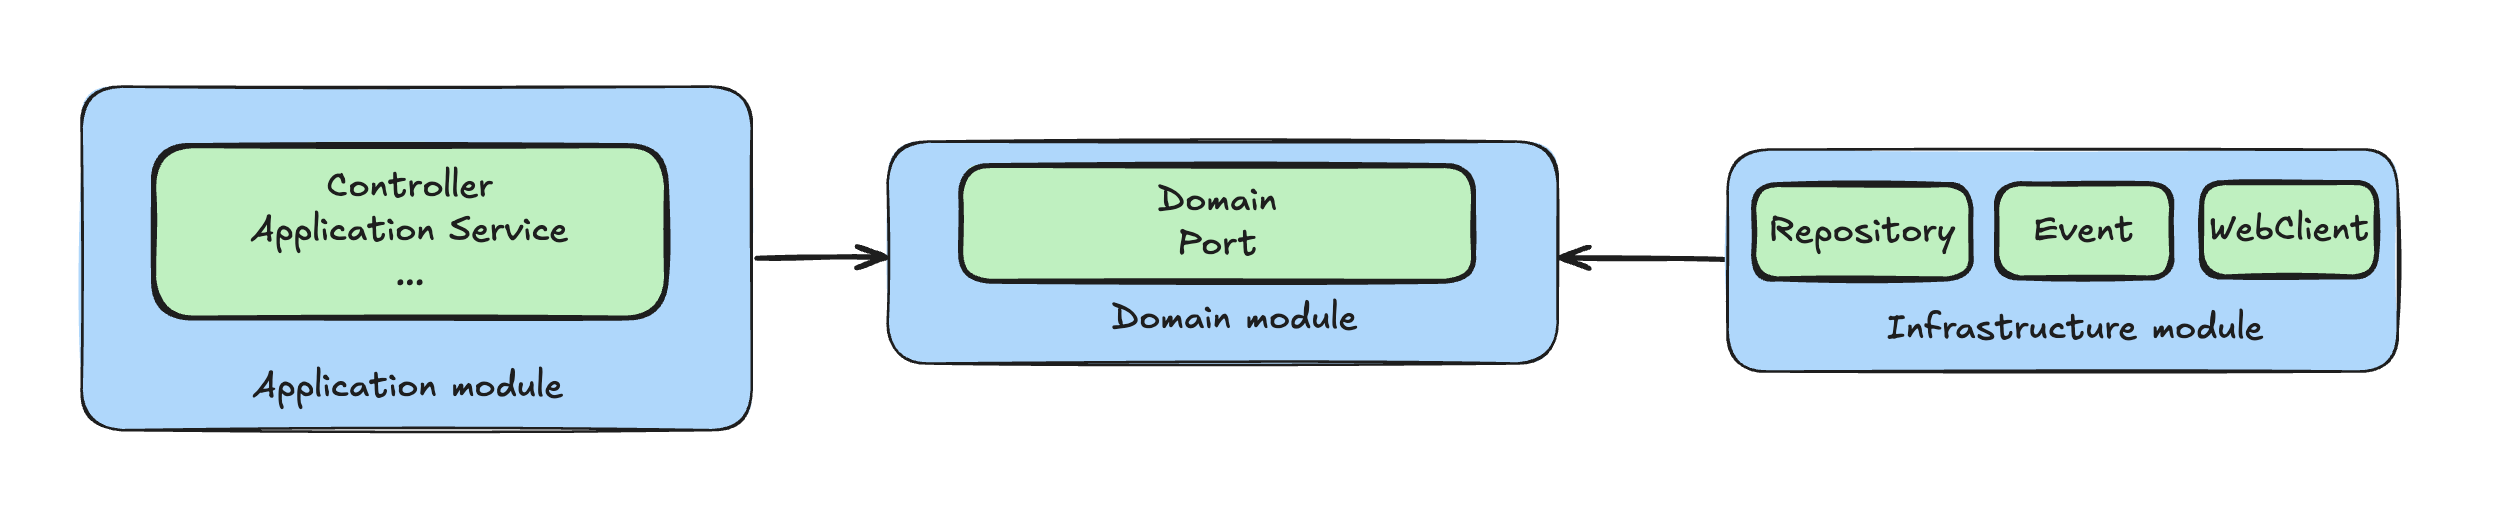
주문 도메인 이벤트 발행 구현 상세
이벤트 발행 기능 설계에서도 기술과 비즈니스 관심사를 분리하기 위한 설계를 진행했습니다.
주문-결제 이벤트 발행은 Transaction Outbox 패턴과 RabbitMQ를 사용하지만, 애플리케이션 계층은 도메인 이벤트 인터페이스에만 의존하여 Transaction Outbox 패턴을 사용하지 않게 되거나 RabbitMQ가 아닌 다른 메세지 브로커를 사용하게 되더라도 변경이 전파되지 않도록 설계했습니다.
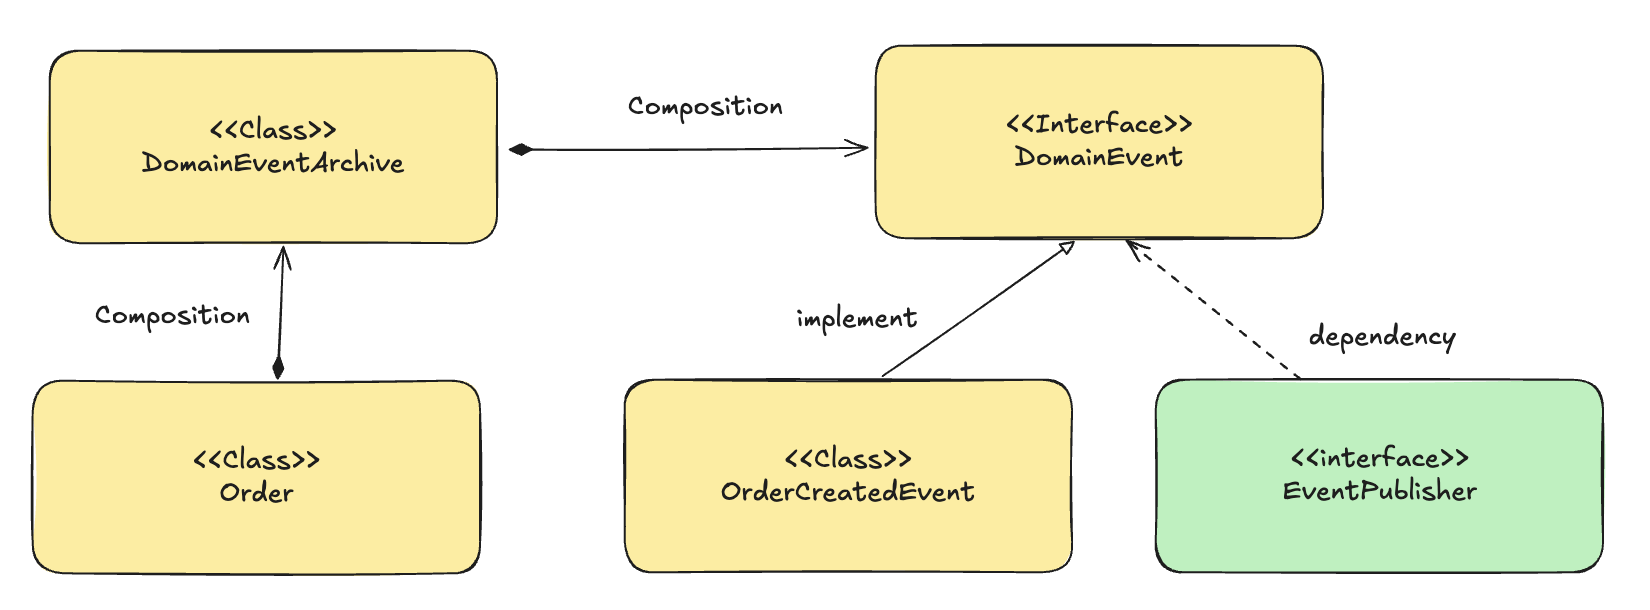
도메인 계층 클래스 다이어그램
도메인 계층에서는 이벤트 관심사를 위와 같이 구현하였습니다.
DomainEvent를 인터페이스로 정의하였습니다.
실제 도메인 이벤트(ex-OrderCreatedEvent)는 DomainEvent를 구현합니다.
도메인 객체는 이벤트 발생시 DomainEvent 인스턴스를 생성하고, DomainEventArchive에 기록합니다.
DomainEventArchive는 DomainEvent 들을 List로 관리합니다.
상속 대신 Composition을 선택하여 도메인 객체의 확장성을 높이고 Lombok 어노테이션을 활용해 코드 중복을 최소화 했습니다.
publicclassOrder {
privateUUIDid;
// 기타 도메인 속성 필드들
...
// Composition으로 도메인 객체 확장 가능성을 열어둠// Lombok의 @Delegate를 사용하여 중복 코드 작성 최소화@Delegate@Builder.DefaultprivateDomainEventArchivearchive = newDomainEventArchive();
}
parsepub is a universal tool written in Kotlin designed to convert an EPUB publication into a data model used later by a reader. In addition it also provides validation and a system that informing about the inconsistency of the format.
Features
converting the publication to a model containing all resources and necessary information
providing EPUB format support in versions 2.0 and 3.0 for all major tags
handling inconsistency errors or lack of necessary elements in the publication structure
support for displaying information when element structure attributes are missing
Restrictions
In order for program to work properly the EPUB file must be created in accordance with the format requirements.
Spec for EPUB 3.0
Spec for EPUB 2.1
Base model – description
The EpubBook class contains all information from an uncompressed EPUB publication.
Each of the parameters corresponds to a set of information parsed from the elements of the publication structure.
data class EpubBook (
    val epubOpfFilePath: String? = null,
    val epubTocFilePath: String? = null,
    val epubCoverImage: EpubResourceModel? = null,
    val epubMetadataModel: EpubMetadataModel? = null,
    val epubManifestModel: EpubManifestModel? = null,
    val epubSpineModel: EpubSpineModel? = null,
    val epubTableOfContentsModel: EpubTableOfContentsModel? = null
)
epubOpfFilePath – Contains absolute path to the .opf file. epubTocFilePath – Contains absolute path to the .toc file. epubCoverImage – Contains all information about the publication cover image. epubMetadataModel – Contains all publication resources. epubManifestModel – Contains all basic information about the publication. epubSpineModel – Contains list of references in reading order. epubTableOfContentsModel – Contains table of contents of the publication.
More info about the elements of the publication in the “Information about epub format for non-developers” section
Quick start
To convert the selected EPUB publication, create an instance of the EpubParser class
val epubParser = EpubParser()
next call parse method on it
epubParser.parse(inputPath, decompressPath)
This method returns an EpubBook class object and has two parameters: inputPath – the path to the EPUB file, decompressPath – path to the place where the file should be unpacked
Error handling in the structure of the publication
The structure of the converted file may be incorrect for one main reason – no required elements of publications such as Metadata, Manifest, Spine, Table of Contents.
Solution – ValidationListeners
To limit the unexpected effects of an incorrect structure, we can create an implementation for properly prepared listeners that will alert us when the format will be wrong.
On the previously created instance of the EpubParser() class, we call the setValidationListeners method, in the body of which we create the implementation of our listeners.
Each listener has been assigned to a specific element.
Our parsing method can return unexpected results also when the set of attributes in the file structure element is not complete
e.g. missing language attribute in Metadata element.
Solution – onAttributeMissing
The mechanism that we created is the answer to the problem illustrated above and it is the part of ValidationListener.
When the required attribute is not correct or missing, our listener reports information with name of him and his parent.
As parameters, we receive two values: parentElement – the name of the main element in which the error occurs attributeName – name of the missing attribute
EPUB is an e-book file format that uses the “.epub” file extension.
Its structure is based on the main elements, such as: Metadata, Manifest, Spine, Table of Contents.
Metadata – contains all metadata information for a specific EPUB file. Three metadata attributes are required (though many are still available): title – contains the title of the book. language – contains the language of the book, identifier – contains the unique identifier of the book.
<metadata xmlns:dc="http://purl.org/dc/elements/1.1/">
   <dc:title id="title">Title of the book</dc:title>
   <dc:language>en</dc:language>
   <dc:identifier id="pub-id">id-identifier</dc:identifier>
Manifest – element lists all the files. Each file is represented by an element, and has the required attributes: id – id of the resource href – location of the resource media-type – type and format of the resource
Spine – element lists all the XHTML content documents in their linear reading order.
Table of contents – contains the hierarchical table of contents for the EPUB file.
A description of the full TOC specification can be found here:
TOC spec for EPUB 2.0
TOC spec for EPUB 3.0
This library has been succeeded by the MX_V2 Library.
This library will remain available since it is very different structurally from the new one, but will not be updated or maintained.
Please migrate to the new one whenever possible.
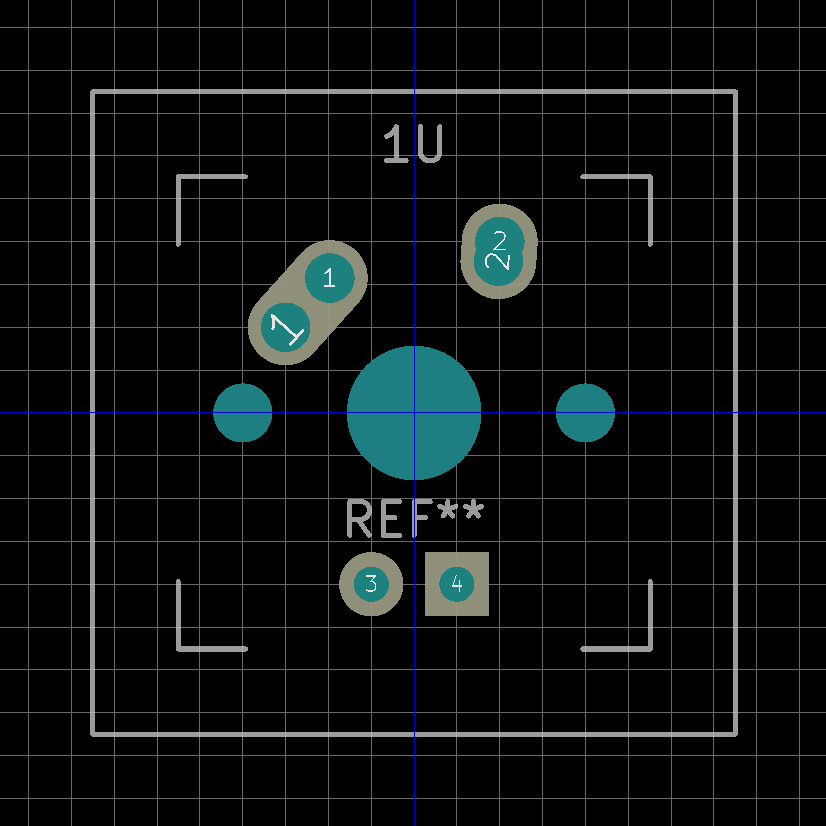
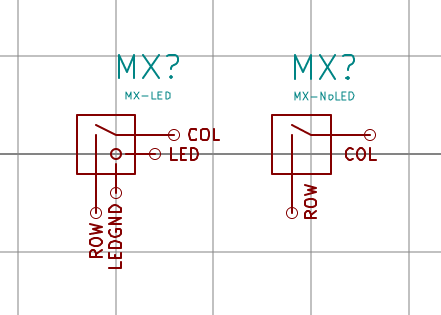
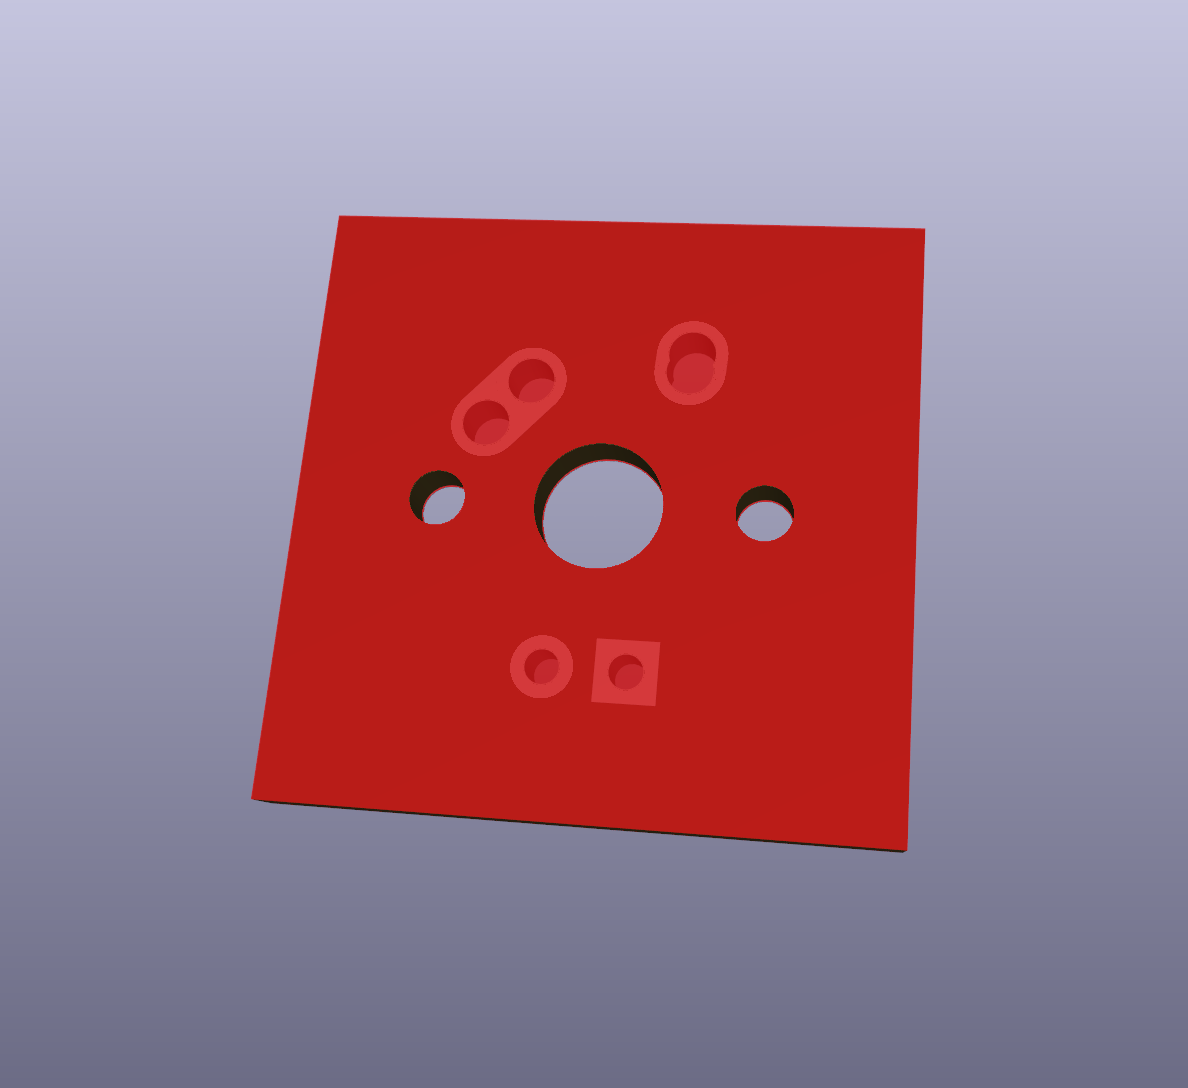
MX_Alps_Hybrid
KiCad Libraries of keyboard switch footprints
Included Libraries
MX_Alps_Hybrid.pretty – The original MX/Alps hybrid support footprints.
FLIPPED – Reversed LED pads for overlapping switch footprints.
NoLED – No LED pads.
ReversedStabilizers – Stabilizer mirrored vertically (i.e. for bottom row).
MX_Only.pretty – Only for Cherry MX and derivative clones.
FLIPPED – Reversed LED pads for overlapping switch footprints.
NoLED – No LED pads.
ReversedStabilizers – Stabilizer mirrored vertically (i.e. for bottom row).
Hotswap – Kailh hotswap sockets of both LED and non-LED variants.
ALPS_Only.pretty – Only for alps SKCM/SKCL, SKBM/SKBL, and clones with same pin structure.
LED – Specifically for Alps SKCL with in-switch indicators.
Kailh_Choc.pretty – Only for Kailh Choc switches.
Features
Designed from scratch using official datasheets and accurate measurements
Various footprints for all occasions
Almost every switch size in existence
Topside soldermask to prevent solder overflow and improve appearance
Upgrading
The library was overhauled on June 1st, 2019 due to its aging structure and contents.
The schematic components were updated to work on the 50mil grid. You can replace the components; however, it will take a decent amount of work.
If you wish to do this, remove the old schematic library, re-add the new one, and replace the schematic components.
The footprint library was divided into four distinct libraries. Remove the previous, re-add the libraries with the footprints you are using, then rebind the footprints in the schematic.
Request More Footprints
I’ll be more than happy to make more custom footprints to fit your needs, time permitting. I will admit that I’m definitely short on time nowadays, so I may not be able to respond right away.
Contributing
Feel free to create pull requests with more footprints. I only ask that they are of high quality, and that they are based on official dimensions, if possible.
Second video game coded in programming language ‘Lua’ and tested in LOVE2D. Pixel art done in GIMP.
HOW TO DOWNLOAD: Download the file by clicking on the GREEN “Code” buttom above. It will download all files in a zip folder. Unzip the folder, and inside you will see seven (7) items. You can delete the four (4) PNG image files, they are just screenshots from the game. You can also delete the folder “Planet Hop – Code” unless you would like to format the code for the game. The folder “Planet Hop – Final Game” is the folder with the playable game! Leave this folder in tact, you can move it to your desktop or any other location, as long as all eight (8) items stay within that folder. There should be seven (7) .dll files along with an .exe file titled Planet_Hop. Double click Planet_Hop.exe and enjoy!
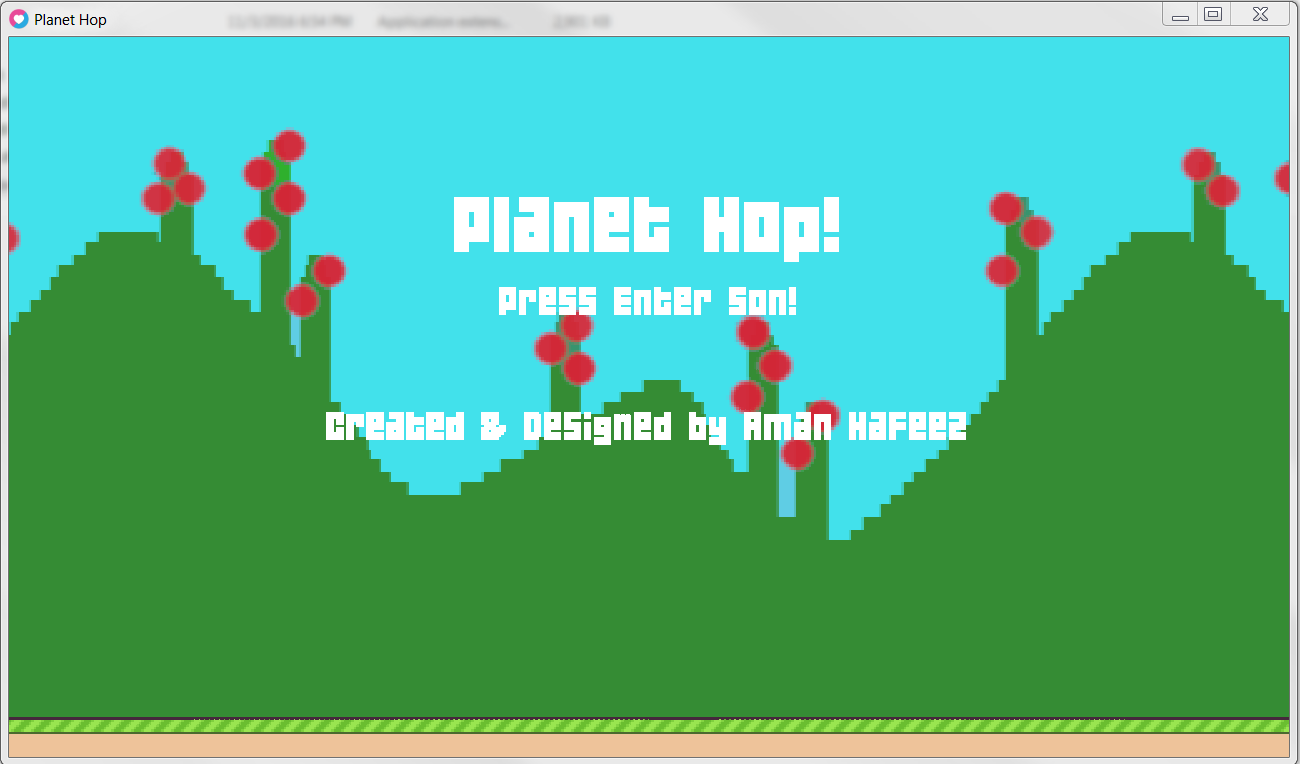
INSTRUCTIONS/ HOW TO PLAY: Press ‘enter’ to start the game. After the timer counts down from 3, press the spacebar to make the spaceship “hop”. Time the pressing of the spacebar right so that you stay floating and don’t hit the alien apartments! See how far you can go!
This is what you see when you first start the game
This is when the game first starts
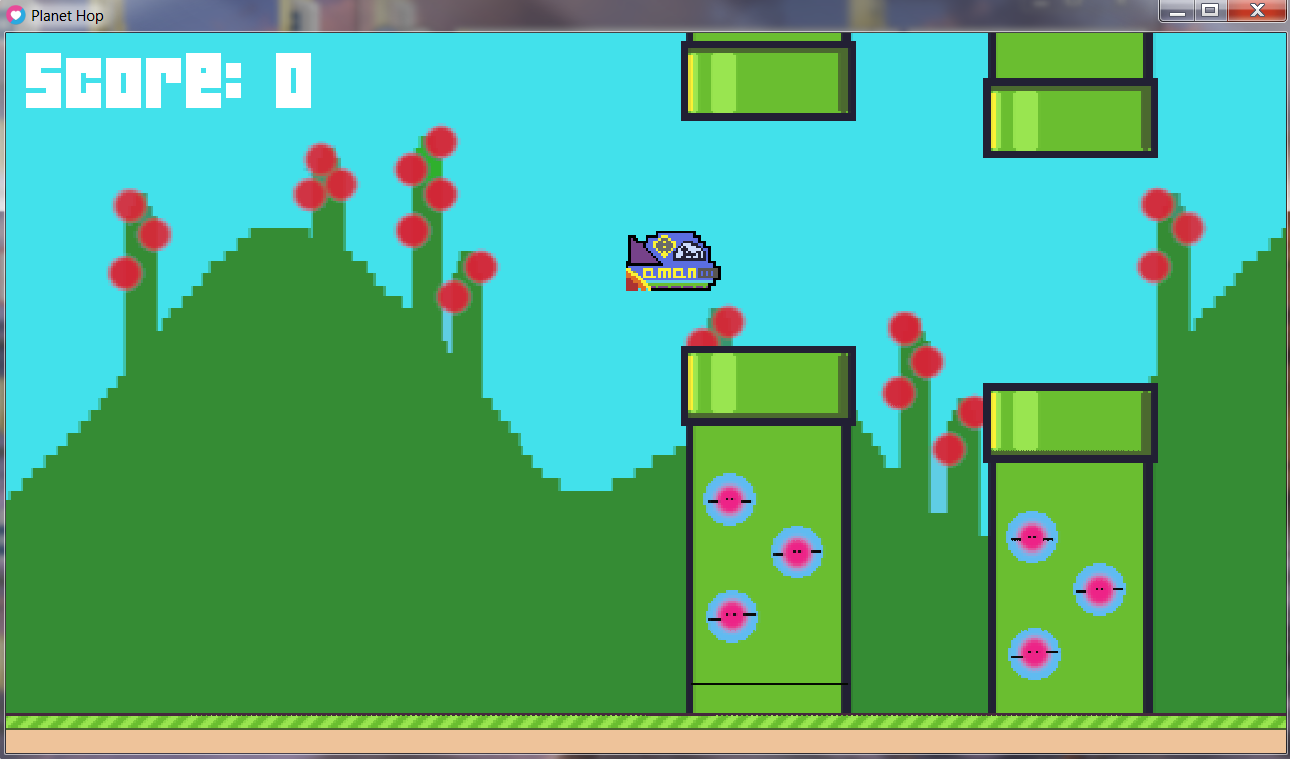
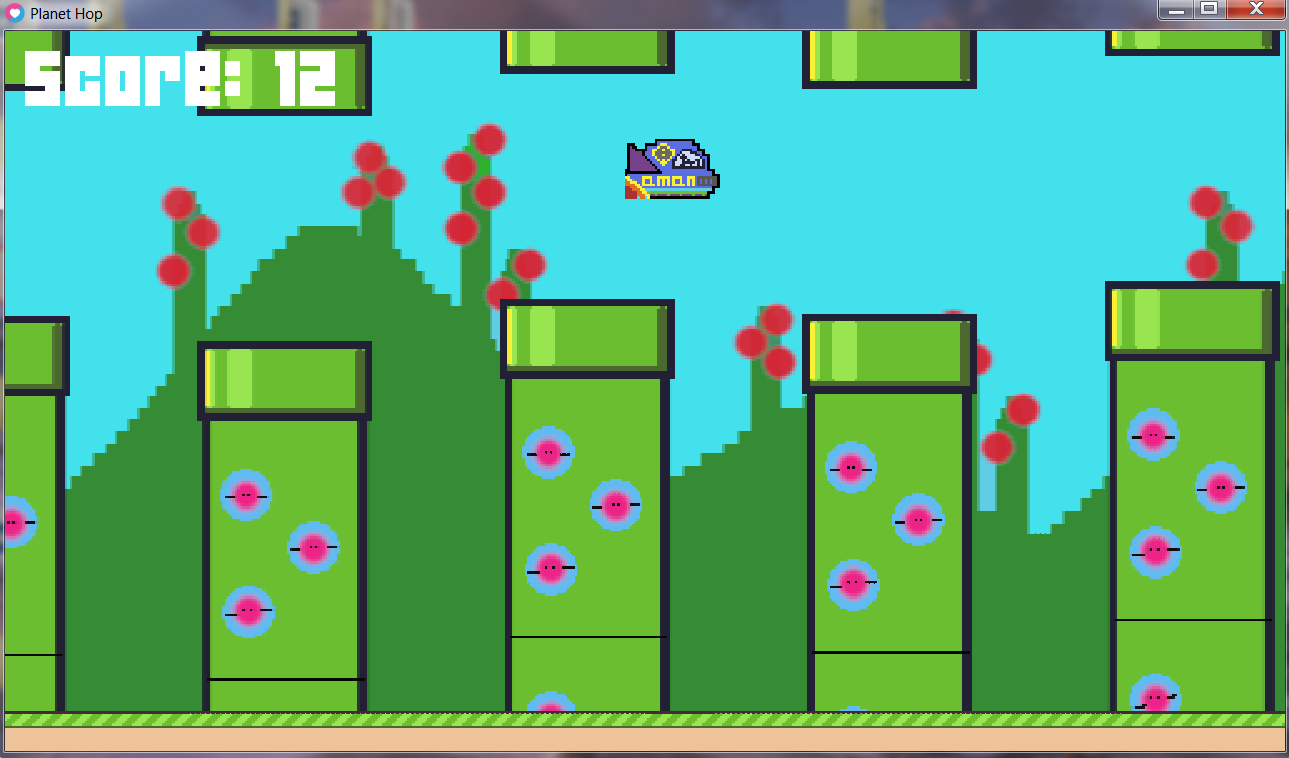
This is how the main gameplay looks like
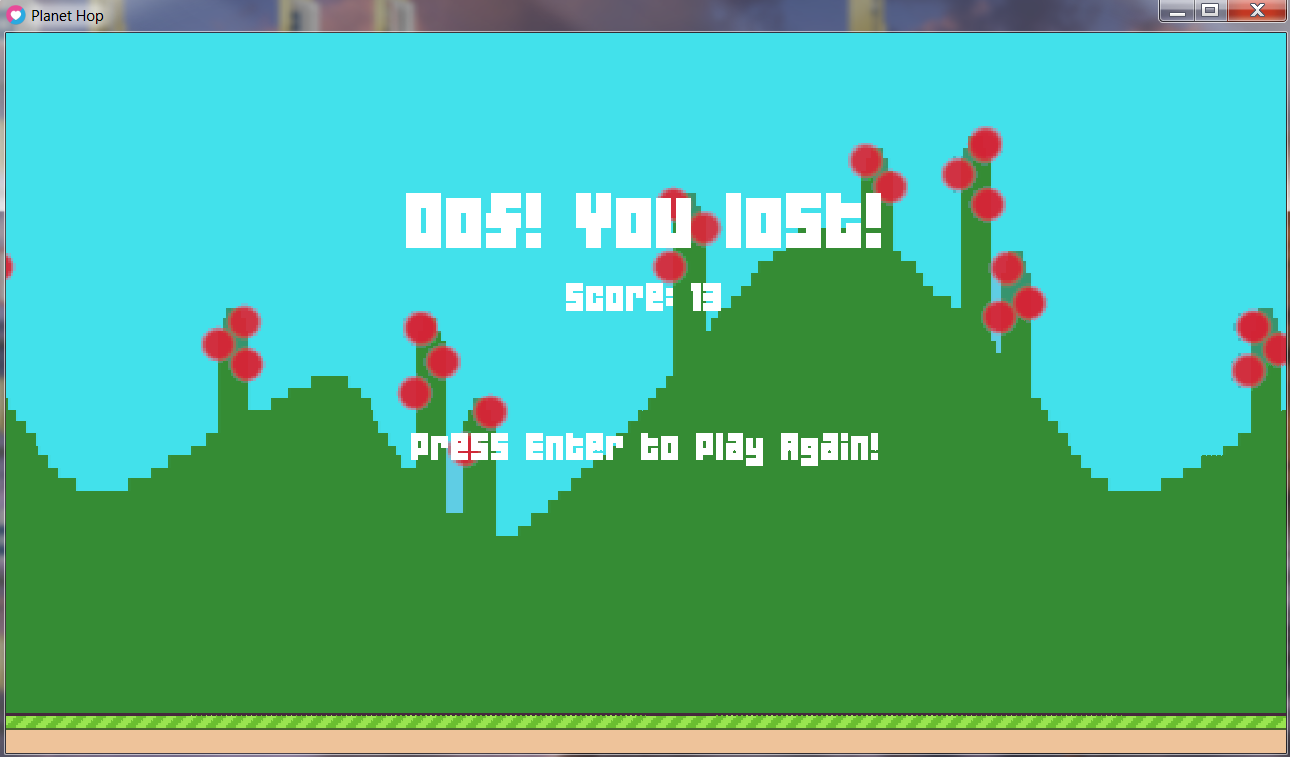
This is what the Score Screen or end of the game looks like
Second video game coded in programming language ‘Lua’ and tested in LOVE2D. Pixel art done in GIMP.
HOW TO DOWNLOAD: Download the file by clicking on the GREEN “Code” buttom above. It will download all files in a zip folder. Unzip the folder, and inside you will see seven (7) items. You can delete the four (4) PNG image files, they are just screenshots from the game. You can also delete the folder “Planet Hop – Code” unless you would like to format the code for the game. The folder “Planet Hop – Final Game” is the folder with the playable game! Leave this folder in tact, you can move it to your desktop or any other location, as long as all eight (8) items stay within that folder. There should be seven (7) .dll files along with an .exe file titled Planet_Hop. Double click Planet_Hop.exe and enjoy!
INSTRUCTIONS/ HOW TO PLAY: Press ‘enter’ to start the game. After the timer counts down from 3, press the spacebar to make the spaceship “hop”. Time the pressing of the spacebar right so that you stay floating and don’t hit the alien apartments! See how far you can go!
This is what you see when you first start the game
This is when the game first starts
This is how the main gameplay looks like
This is what the Score Screen or end of the game looks like
The application is intended to be deployed upon the MicroApps framework and it operates on a DynamoDB Table created by the MicroApps framework. Thus, it is required that there be a deployment of MicroApps that can receive this application. Deploying the MicroApps framework and general application deployment instructions are covered by the MicroApps documentation.
The application is packaged for deployment via AWS CDK and consists of a single Lambda function that reads/writes the MicroApps DynamoDB Table.
In Flag #15, we can see that Transfer Learning works really well with 3 different anime characters: Nishikino Maki, Kotori Minami, and Ayase Eli.
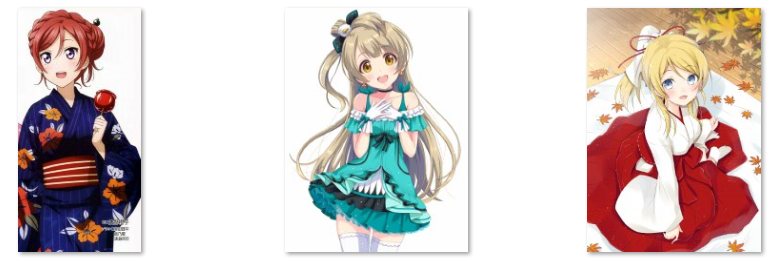
In this experiment, we will try to push Transfer Learning further, by using 3 different anime characters which have hair color similarity: Nishikino Maki, Takimoto Hifumi, and Sakurauchi Riko.
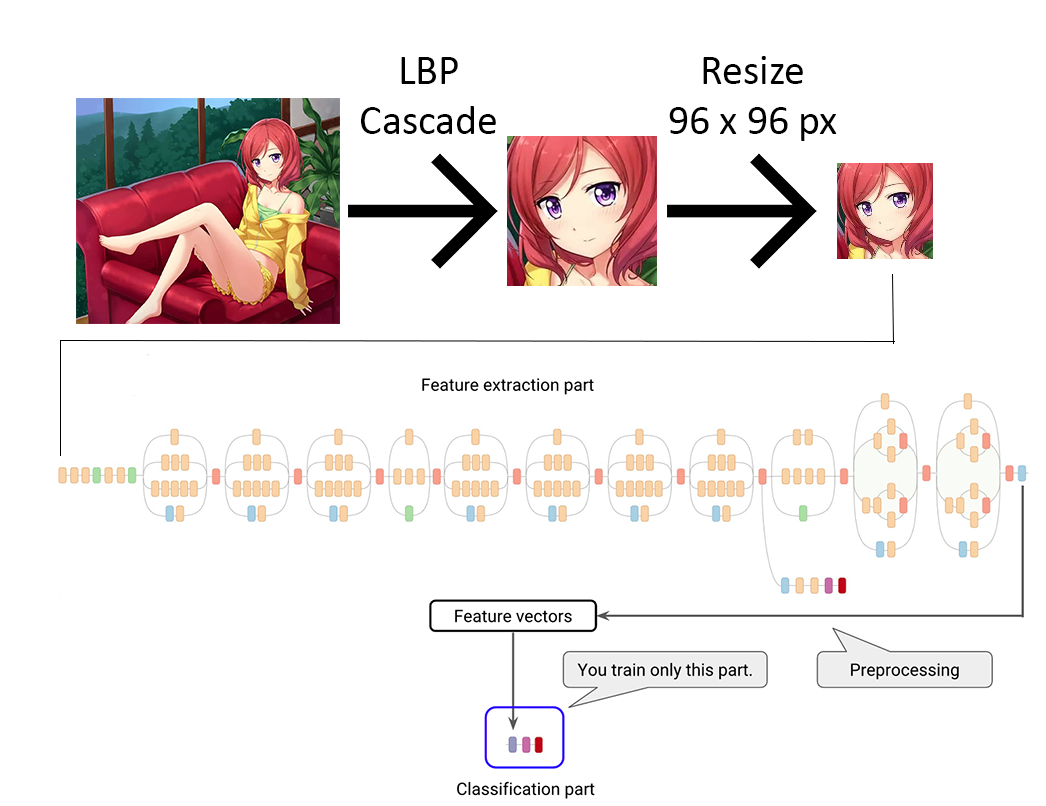
This experiment has 3 main steps:
Utilize lbpcascade_animeface to recognize character face from each images
Resize each images to 96 x 96 pixels
Split images into training & test before creating the final model
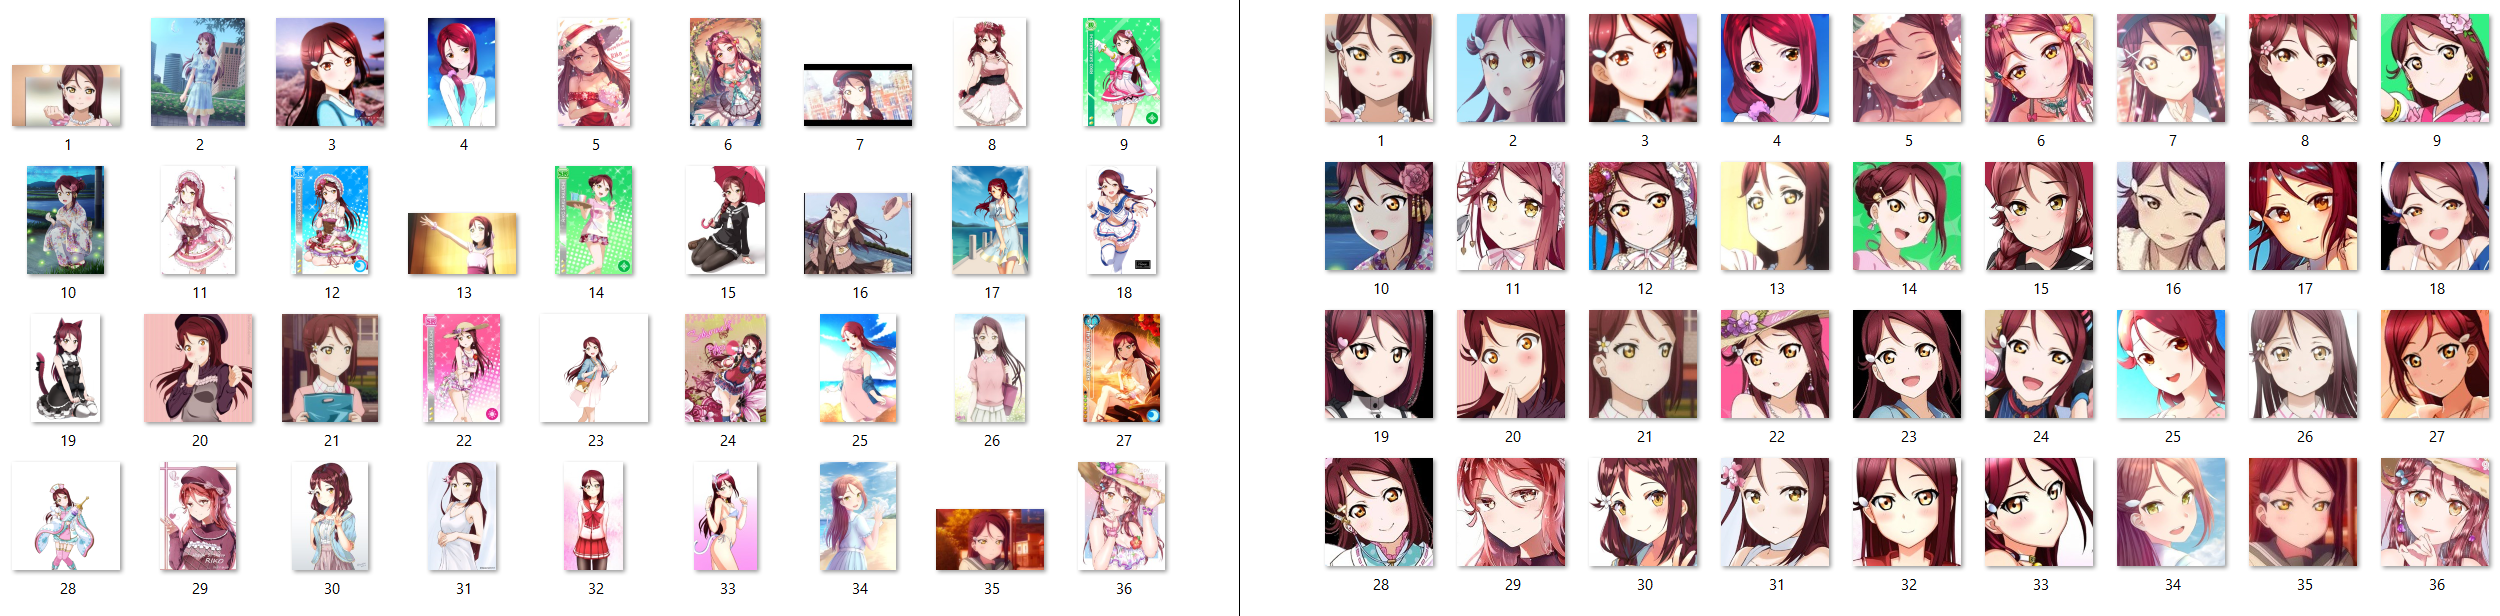
raw directory contains 36 images for each characters (JPG & PNG format). The first 30 images are used for training while the last 6 images are used for test.
As an example, we got the following result after applying Step 1 (cropped directory is shown at the right side):
lbpcascade_animeface can detect character faces with an accuracy of around 83%. Failed images are stored in raw (unrecognized) for future improvements.
Since we have 3 characters and 6 test images for each which are not part of training, resized_for_test contains 18 images in total. Surprisingly, almost all characters are detected properly!
Update (Nov 13, 2017): See animeface-2009 section below, which push face detection accuracy to 93%.
After running the step above, you can decide how many images will be used in resized_for_training and how many images will be used in resized_for_test.
Re-train the Inception model by using transfer learning:
As you can see above, the similarity between Nishikino Maki and Sakurauchi Miko starts to lower down the confidence level of the resulted model. Nevertheless, all classifications are still correct, where 4 out of 6 maintain the threshold of > 0.95.
Interestingly, the addition of 3rd character increases the confidence level of several Takimoto Hifumi testcases (see 1st and 4th result). Overall, this character can be easily differentiated compared to the other two.
From this experiment, it seems that the current bottleneck is located at Step 1 (face detection), which have the overall accuracy of 83% in face detection.
animeface-2009
nagadomi/animeface-2009 provides another method of face detection. 13 out of 21 unrecognized images are now recognized in cropped (unrecognized) directory.
Current found limitations: it seems the script requires more memory and slower to run compared to lbpcascade_animeface.xml.
Since this method gives better result in detecting anime character face and classification still works with almost the same result, the overall face detection accuracy is now around 93%.