Blog

  • streamLit-cv-mediapipe

    Python Vision

    This code is based on a free tutorial by Agumented Startups. All free tutorials available on augmentedstartups.com. Changes made:

    • Updated all dependencies to latest version
    • Removed deprecation errors
    • Added new demo files see sources

    Face Landmark Detection

    Basic Setup

    Go to Augmented Startups and open the Face Landmark Detection StreamLit User Interface project page. Scroll down and download the project setup files:

    mkdir /opt/Python/streamLit/ cd /opt/Python/streamLit/ 
    wget https://www.augmentedstartups.com/resource_redirect/downloads/sites/104576/themes/2148177103/downloads/yWtJ2GTTUmbdL4paud0M_Face-Mesh-MediaPipe-StreamLit.zip
    unzip yWtJ2GTTUmbdL4paud0M_Face-Mesh-MediaPipe-StreamLit.zip

    The project contains a requirements.txt file that we can use to install the following dependencies into your virtual environment:

    opencv_python_headless==4.5.2.54
    streamlit==0.82.0
    mediapipe==0.8.4.2
    numpy==1.18.5
    Pillow==8.2.0
    pip install -r requirements.txt

    StreamLit

    Streamlit is an open-source Python library that makes it easy to create and share beautiful, custom web apps for machine learning and data science. In just a few minutes you can build and deploy powerful data apps.

    Create a new Python file face_mesh_app.py and import the dependencies:

    import streamlit as st
    import mediapipe as mp
    import cv2 as cv
    import numpy as np
    import tempfile
    import time
    from PIL import Image

    Test your installation by running the following and opening your browser on localhost:8501:

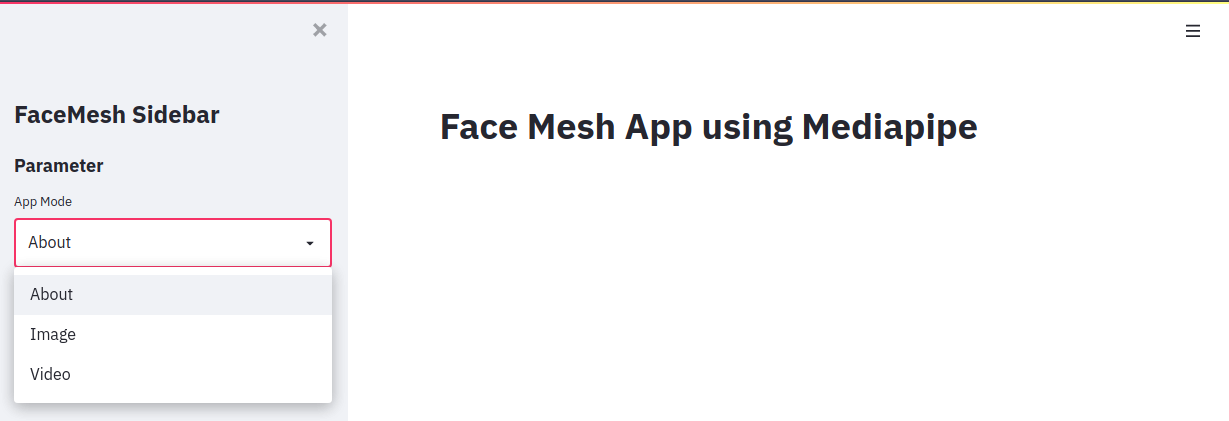
    st.title('Face Mesh App using Mediapipe')
    streamlit run face_mesh_app.py

    You should see the title displayed on the Top of your page. Ok now we can continue building the rest of the page:

    # Basic App Scaffolding
    st.title('Face Mesh App using Streamlit')
    
    st.markdown(
        """
        <style>
        [data-testid="stSidebar"][aria-expanded="true"] > div:first-child{
            width: 350px
        }
        [data-testid="stSidebar"][aria-expanded="false"] > div:first-child{
            width: 350px
            margin-left: -350px
        }
        </style>
        """,
        unsafe_allow_html=True,
    )
    
    # Create Sidebar
    st.sidebar.title('FaceMesh Sidebar')
    st.sidebar.subheader('Parameter')
    
    # Define available pages in selection box
    app_mode = st.sidebar.selectbox(
        'App Mode',
        ['About','Image','Video']
    )

    StreamLit

    Make sure that the image dimensions do not exceed the dimensions of the page – else resize:

    # Resize Images to fit Container
    @st.cache()
    # Get Image Dimensions
    def image_resize(image, width=None, height=None, inter=cv.INSTER_AREA):
        dim = None
        (h,w) = image.shape[:2]
    
        if width is None and height is None:
            return image
    
        if width is None:
            r = width/float(w)
            dim = (int(w*r),height)
    
        else:
            r = width/float(w)
            dim = width, int(h*r)
    
        # Resize image
        resized = cv.resize(image,dim,interpolation=inter)
    
        return resized

    Create About Page

    # About Page
    
    if app_mode == 'About':
        st.markdown('''
                    ## Face Mesh \n
                    In this application we are using **MediaPipe** for creating a Face Mesh. **StreamLit** is used to create the Web Graphical User Interface (GUI) \n
                    
                    - [Github](https://github.com/mpolinowski/streamLit-cv-mediapipe) \n
        ''')
    
    ## Add Sidebar and Window style
    st.markdown(
        """
        <style>
        [data-testid="stSidebar"][aria-expanded="true"] > div:first-child{
            width: 350px
        }
        [data-testid="stSidebar"][aria-expanded="false"] > div:first-child{
            width: 350px
            margin-left: -350px
        }
        </style>
        """,
        unsafe_allow_html=True,
    )

    Create Image Page

    StreamLit

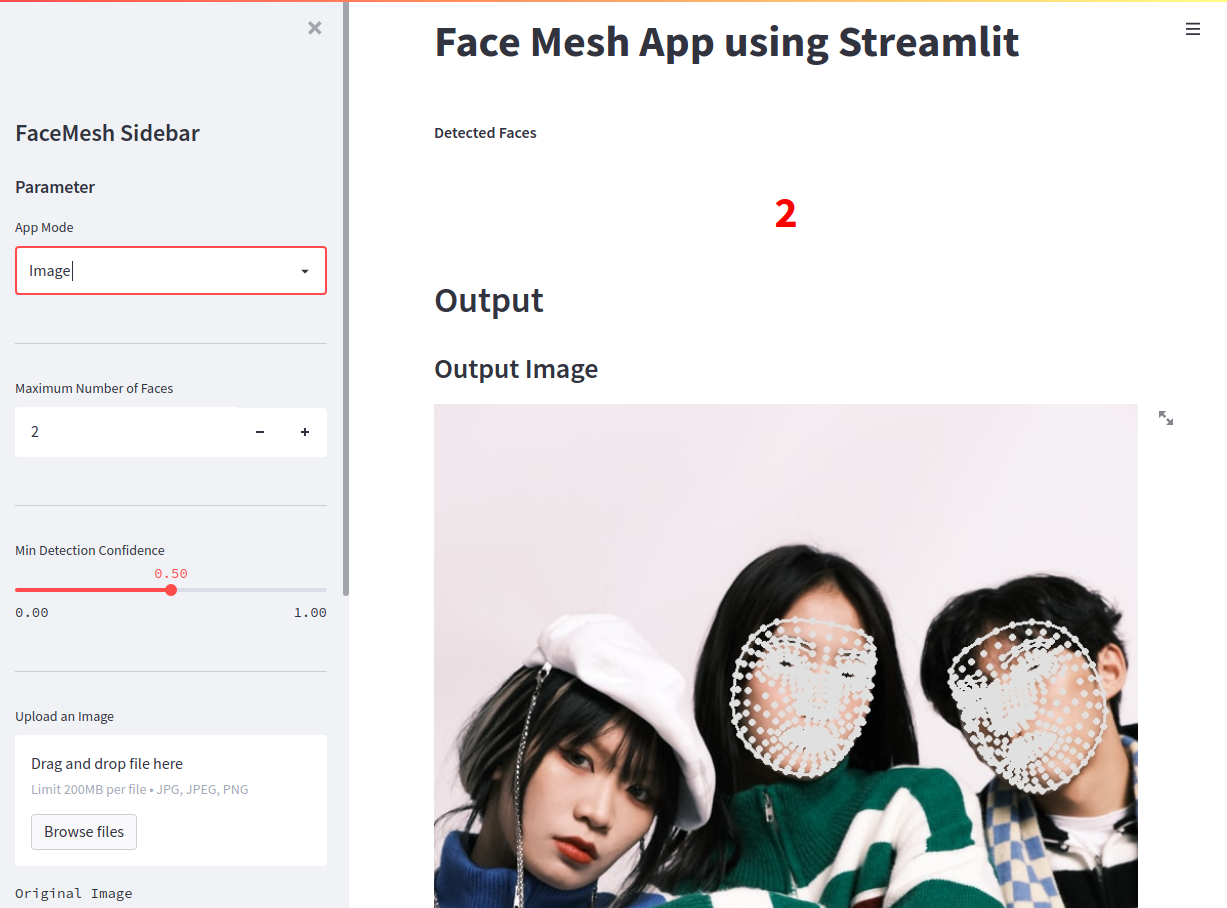
    elif app_mode == 'Image':
        drawing_spec = mp.solutions.drawing_utils.DrawingSpec(thickness=2, circle_radius=1)
    
        st.sidebar.markdown('---')
    
        ## Add Sidebar and Window style
        st.markdown(
            """
            <style>
            [data-testid="stSidebar"][aria-expanded="true"] > div:first-child{
                width: 350px
            }
            [data-testid="stSidebar"][aria-expanded="false"] > div:first-child{
                width: 350px
                margin-left: -350px
            }
            </style>
            """,
            unsafe_allow_html=True,
        )
    
        st.markdown("**Detected Faces**")
        kpil_text = st.markdown('0')
    
        max_faces = st.sidebar.number_input('Maximum Number of Faces', value=2, min_value=1)
        st.sidebar.markdown('---')
    
        detection_confidence = st.sidebar.slider('Min Detection Confidence', min_value=0.0,max_value=1.0,value=0.5)
        st.sidebar.markdown('---')
    
        img_file_buffer = st.sidebar.file_uploader("Upload an Image", type=["jpg","jpeg","png"])
        if img_file_buffer is not None:
            image = np.array(Image.open(img_file_buffer))
    
        else:
            demo_image = DEMO_IMAGE
            image = np.array(Image.open(demo_image))
    
        st.sidebar.text('Original Image')
        st.sidebar.image(image)
    
        face_count=0
    
        ## Dashboard
        with mp.solutions.face_mesh.FaceMesh(
            static_image_mode=True, #Set of unrelated images
            max_num_faces=max_faces,
            min_detection_confidence=detection_confidence
        ) as face_mesh:
    
                results = face_mesh.process(image)
                out_image=image.copy()
    
                #Face Landmark Drawing
                for face_landmarks in results.multi_face_landmarks:
                    face_count += 1
    
                    mp.solutions.drawing_utils.draw_landmarks(
                        image=out_image,
                        landmark_list=face_landmarks,
                        connections=mp.solutions.face_mesh.FACE_CONNECTIONS,
                        landmark_drawing_spec=drawing_spec
                    )
    
                    kpil_text.write(f"<h1 style='text-align: center; color:red;'>{face_count}</h1>", unsafe_allow_html=True)
    
                st.subheader('Output Image')
                st.image(out_image, use_column_width=True)

    Create Video Page

    StreamLit

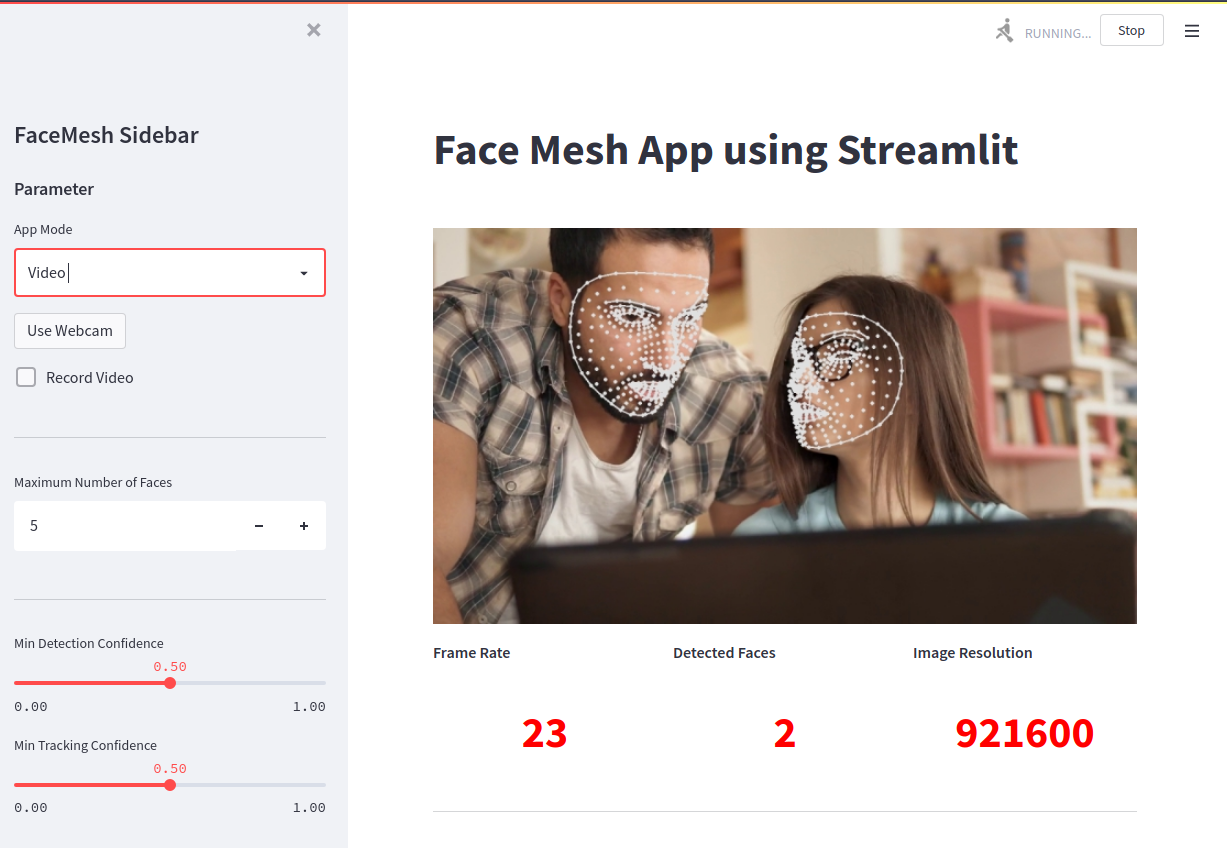
    elif app_mode == 'Video':
    
        st.set_option('deprecation.showfileUploaderEncoding', False)
    
        use_webcam = st.sidebar.button('Use Webcam')
        record = st.sidebar.checkbox("Record Video")
    
        if record:
            st.checkbox('Recording', True)
    
        drawing_spec = mp.solutions.drawing_utils.DrawingSpec(thickness=2, circle_radius=1)
    
        st.sidebar.markdown('---')
    
        ## Add Sidebar and Window style
        st.markdown(
            """
            <style>
            [data-testid="stSidebar"][aria-expanded="true"] > div:first-child{
                width: 350px
            }
            [data-testid="stSidebar"][aria-expanded="false"] > div:first-child{
                width: 350px
                margin-left: -350px
            }
            </style>
            """,
            unsafe_allow_html=True,
        )
    
        max_faces = st.sidebar.number_input('Maximum Number of Faces', value=5, min_value=1)
        st.sidebar.markdown('---')
        detection_confidence = st.sidebar.slider('Min Detection Confidence', min_value=0.0,max_value=1.0,value=0.5)
        tracking_confidence = st.sidebar.slider('Min Tracking Confidence', min_value=0.0,max_value=1.0,value=0.5)
        st.sidebar.markdown('---')
    
        ## Get Video
        stframe = st.empty()
        video_file_buffer = st.sidebar.file_uploader("Upload a Video", type=['mp4', 'mov', 'avi', 'asf', 'm4v'])
        temp_file = tempfile.NamedTemporaryFile(delete=False)
    
        if not video_file_buffer:
            if use_webcam:
                video = cv.VideoCapture(0)
            else:
                video = cv.VideoCapture(DEMO_VIDEO)
                temp_file.name = DEMO_VIDEO
    
        else:
            temp_file.write(video_file_buffer.read())
            video = cv.VideoCapture(temp_file.name)
    
        width = int(video.get(cv.CAP_PROP_FRAME_WIDTH))
        height = int(video.get(cv.CAP_PROP_FRAME_HEIGHT))
        fps_input = int(video.get(cv.CAP_PROP_FPS))
    
        ## Recording
        codec = cv.VideoWriter_fourcc('a','v','c','1')
        out = cv.VideoWriter('output1.mp4', codec, fps_input, (width,height))
    
        st.sidebar.text('Input Video')
        st.sidebar.video(temp_file.name)
    
        fps = 0
        i = 0
    
        drawing_spec = mp.solutions.drawing_utils.DrawingSpec(thickness=2, circle_radius=1)
    
        kpil, kpil2, kpil3 = st.columns(3)
    
        with kpil:
            st.markdown('**Frame Rate**')
            kpil_text = st.markdown('0')
    
        with kpil2:
            st.markdown('**Detected Faces**')
            kpil2_text = st.markdown('0')
    
        with kpil3:
            st.markdown('**Image Resolution**')
            kpil3_text = st.markdown('0')
    
        st.markdown('<hr/>', unsafe_allow_html=True)
    
    
        ## Face Mesh
        with mp.solutions.face_mesh.FaceMesh(
            max_num_faces=max_faces,
            min_detection_confidence=detection_confidence,
            min_tracking_confidence=tracking_confidence
    
        ) as face_mesh:
    
                prevTime = 0
    
                while video.isOpened():
                    i +=1
                    ret, frame = video.read()
                    if not ret:
                        continue
    
                    results = face_mesh.process(frame)
                    frame.flags.writeable = True
    
                    face_count = 0
                    if results.multi_face_landmarks:
    
                        #Face Landmark Drawing
                        for face_landmarks in results.multi_face_landmarks:
                            face_count += 1
    
                            mp.solutions.drawing_utils.draw_landmarks(
                                image=frame,
                                landmark_list=face_landmarks,
                                connections=mp.solutions.face_mesh.FACEMESH_CONTOURS,
                                landmark_drawing_spec=drawing_spec,
                                connection_drawing_spec=drawing_spec
                            )
    
                    # FPS Counter
                    currTime = time.time()
                    fps = 1/(currTime - prevTime)
                    prevTime = currTime
    
                    if record:
                        out.write(frame)
    
                    # Dashboard
                    kpil_text.write(f"<h1 style='text-align: center; color:red;'>{int(fps)}</h1>", unsafe_allow_html=True)
                    kpil2_text.write(f"<h1 style='text-align: center; color:red;'>{face_count}</h1>", unsafe_allow_html=True)
                    kpil3_text.write(f"<h1 style='text-align: center; color:red;'>{width*height}</h1>",
                                     unsafe_allow_html=True)
    
                    frame = cv.resize(frame,(0,0), fx=0.8, fy=0.8)
                    frame = image_resize(image=frame, width=640)
                    stframe.image(frame,channels='BGR', use_column_width=True)
    Visit original content creator repository https://github.com/mpolinowski/streamLit-cv-mediapipe
  • DuckYAML

    DuckYAML

    Convert your Spring .yml configuration to .properties files and get rid of SnakeYAML.

    What the duck is this about?

    This is a simple Python script that is designed to generate .properties files from an existing .yml file.

    • Since this process involves removing SnakeYAML, make sure your application does not directly use SnakeYAML.
    • It will generate separate files for each profile named application-{profile}.properties.
    • Shared properties are saved to application.properties file.
    • This is tested for a single application.yml file with multiple profiles.

    Background

    Spring uses SnakeYAML to parse configuration stored in the .yml file. Despite being a mature library, SnakeYAML has a track record of having vulnerabilities since its inception on 2009 — checkout it out on mvnrepository! Even the recent versions (>= 1.32) have critical vulnerability (CVE-1471). In an enterprise setting, you application could be marked as vulnerable because of this.

    However, it doesn’t have to be that way. Spring doesn’t really need SnakeYAML if .properties files are used instead. This is where the library comes handy. It automatically creates .properties files based on your current application.yaml file.

    Steps to use

    Make sure you have Python3 Installed.

    1. Clone this repo to a safe directory.
    2. cd DuckYAML
    3. Install dependencies using: pip3 install -r requirements.txt.
    4. Place your application.yml file under input directory.
    5. Run the command as python3 main.py.
    6. Check output directory to see your .properties files.
    7. Copy the properties files to your applications src/main/resources directory.
    8. Follow the SnakeYAML Removal Process below.

    Folders after script run

    SnakeYAML Removal Process

    1. Run mvn dependency:tree and see any snakeyaml transitive dependency. It should be under spring-boot-starter.
    2. Exclude snakeyaml using maven exclusion.
    3. Repeat step 1 and 2 until you don’t see snakeyaml in the dependency tree.
    4. Run the application to ensure its functional.

    Excluding snakeyaml Dependency

    <dependency>
        <groupId>org.springframework.boot</groupId>
        <artifactId>spring-boot-starter</artifactId>
        <version>${spring-boot.version}</version>
        <exclusions>
            <exclusion>
                <groupId>org.yaml</groupId>
                <artifactId>snakeyaml</artifactId>
            </exclusion>
        </exclusions>
    </dependency>
    
    Visit original content creator repository https://github.com/prashantghimire/DuckYAML
  • ArduinoCore-stm32l0

    Arduino Core for STM32L0 based boards

    What is it ?

    ArduinoCore-stm32l0 is targeted at ultra low power scenarios, sensor hubs, with LoRaWAN connectivity.

    Supported boards

    Tlera Corp

    STMicroelectronics

    Installing

    Board Manager

    1. Download and install the Arduino IDE (at least version v1.6.8)
    2. Start the Arduino IDE
    3. Go into Preferences
    4. Add https://grumpyoldpizza.github.io/ArduinoCore-stm32l0/package_stm32l0_boards_index.json as an “Additional Board Manager URL”
    5. Open the Boards Manager from the Tools -> Board menu and install “Tlera Corp STM32L0 Boards”
    6. Select your STM32L0 board from the Tools -> Board menu

    OS Specific Setup

    Linux

    1. Go to ~/.arduino15/packages/TleraCorp/hardware/stm32l0/<VERSION>/drivers/linux/
    2. sudo cp *.rules /etc/udev/rules.d
    3. reboot
    Windows

    STM32 BOOTLOADER driver setup for Tlera Corp boards

    1. Download Zadig
    2. Plugin STM32L0 board and toggle the RESET button while holding down the BOOT button
    3. Let Windows finish searching for drivers
    4. Start Zadig
    5. Select Options -> List All Devices
    6. Select STM32 BOOTLOADER from the device dropdown
    7. Select WinUSB (v6.1.7600.16385) as new driver
    8. Click Replace Driver
    USB Serial driver setup for Tlera Corp boards (Window XP / Windows 7 only)

    1. Go to ~/AppData/Local/Arduino15/packages/TleraCorp/hardware/stm32l0/<VERSION>/drivers/windows
    2. Right-click on dpinst_x86.exe (32 bit Windows) or dpinst_amd64.exe (64 bit Windows) and select Run as administrator
    3. Click on Install this driver software anyway at the Windows Security popup as the driver is unsigned
    ST-LINK V2.1 driver setup for STMicroelectronics boards

    1. Plugin STMicroelectronics board
    2. Download and install ST-Link USB Drivers

    From git

    1. Follow steps from Board Manager section above
    2. cd <SKETCHBOOK>, where <SKETCHBOOK> is your Arduino Sketch folder:
    • OS X: ~/Documents/Arduino
    • Linux: ~/Arduino
    • Windows: ~/Documents/Arduino
    1. Create a folder named hardware, if it does not exist, and change directories to it
    2. Clone this repo: git clone https://github.com/grumpyoldpizza/ArduinoCore-stm32l0.git TleraCorp/stm32l0
    3. Restart the Arduino IDE

    Recovering from a faulty sketch for Tlera Corp Boards

    Sometimes a faulty sketch can render the normal USB Serial based integration into the Arduindo IDE not working. In this case plugin the STM32L0 board and toggle the RESET button while holding down the BOOT button and program a known to be working sketch to go back to a working USB Serial setup.

    Credits

    This core is based on and compatible with the Arduino SAMD Core

    Visit original content creator repository
    https://github.com/GrumpyOldPizza/ArduinoCore-stm32l0

  • multitextor

    Multitextor

    Screenshot Cross platform console mode text editor.

    This project is mostly recreated version of my old text editor.

    BSD-2 license

    In progress

    • Editor 2.0.0-beta version.

    Key features

    • Simple user friendly interface same in different environments (with menu and dialog)
    • Mouse and keyboard cursor movement and selection
    • Multi-window
    • Split view mode with 2 panels
    • Clear working with different text code pages
    • Different select modes
    • Working with macros
    • Big files editing over 4 GBytes (with small memory using)
    • Deep Undo/Redo
    • Customizable key commands and some interface parameters
    • Customizable syntax highlighting
    • Editor session saving/restoring
    • Searching in on disk files

    Will be implemented in the next versions:

    • Backup files
    • Random access bookmarks
    • Build-in file comparing mode

    Editor screenshot. Screenshot

    Tested on

    Linux/Windows/OSX/FreeBSD

    • Windows 11 – Microsoft Visual Studio Community 2022 / 2019 / 2017
    • Windows 10 – Microsoft Visual Studio Community 2019 / 2017
    • Windows 7 – Microsoft Visual Studio Community 2017
    • Linux Ubuntu 18.04 – gcc version 9.3.0
    • Linux Ubuntu 20.04 – gcc version 9.3.0
    • Armbian Focal OrangePI 4

    For building it needs a compiler with C++ 0x17 full support.

    Minimal requirement: gcc 8.0 or MSVS 2017

    Need to install packages in Linux

    • sudo apt-get install -y libncurses5-dev
    • sudo apt-get install -y libgpm-dev
    • sudo apt-get install -y gpm (only for mouse supporting in console)

    How to build

    • Install CMake 3.15 or higher

    • Install g++-9 or clang or MSVC

    • Run CMake: cmake -B _build -S .

      or cmakegen.bat

    • Build editor

      • in Linux run: build.sh
      • in Windows try to run: msbuild /p:Configuration=Release Multitextor.sln
      • or open solution _build/Multitextor.sln with MSVC
    • Get editor in Linux _build/bin/multitextor or in Windows _build/bin/Debug|Release/multitextor.exe

    Linux: get binaries packet from snap

    Snap packet link: snap packet

    • Install: snap install –edge –devmode multitextor

    • Update: snap refresh –edge –devmode multitextor

    Windows: get zip archive from AppVeyor CI artifacts

    Zip archive link: zip archive

    Visit original content creator repository https://github.com/vikonix/multitextor
  • Futures

    Futures

    Tests

    Futures is a cross-platform framework for simplifying asynchronous programming, written in Swift. It’s lightweight, fast, and easy to understand.

    Supported Platforms

    • Ubuntu 14.04
    • macOS 10.9
    • tvOS 9.0
    • iOS 8.0
    • watchOS 2.0

    Architecture

    Fundamentally, Futures is a very simple framework, that consists of two types:

    • Promise, a single assignment container producing a Future
    • Future, a read-only container resolving into either a value, or an error

    In many promise frameworks, a promise is undistinguished from a future. This introduces mutability of a promise that gets passed around. In Futures, a Future is the observable value while a Promise is the function that sets the value.

    Futures are observed, by default, on a single concurrent dispatch queue. This queue can be modified by assigning a different queue to DispatchQueue.futures. You can also specify a queue of your choice to each callback added to a future .

    A future is regarded as:

    • resolved, if its value is set
    • fulfilled, if the value is set, and successful
    • rejected, if the value is set, and a failure (error)

    Usage

    When a function returns a Future<Value>, you can either decide to observe it directly, or continue with more asynchronous tasks. For observing, you use:

    • whenResolved, if you’re interested in both a value and a rejection error
    • whenFulfilled, if you only care about the values
    • whenRejected, if you only care about the error

    If you have more asynchronous work to do based on the result of the first future, you can use

    • flatMap(), to execute another future based on the result of the current one
    • flatMapIfRejected(), to recover from a potential error resulting from the current future
    • flatMapThrowing(), to transform the fulfilled value of the current future or return a rejected future
    • map(), to transform the fulfilled value of the current future
    • recover(),to transform a rejected future into a fulfilled future
    • always(), to execute a Void returning closure regardless of whether the current future is rejected or resolved
    • and(), to combine the result of two futures into a single tuple
    • Future<T>.reduce(), to combine the result of multiple futures into a single future

    Note that you can specify an observation dispatch queue for all these functions. For instance, you can use flatMap(on: .main), or .map(on: .global()). By default, the queue is DispatchQueue.futures.

    As a simple example, this is how some code may look:

    let future = loadNetworkResource(
        from: URL("http://someHost/resource")!
    ).flatMapThrowing { data in
        try jsonDecoder.decode(SomeType.self, from: data)
    }.always {
        someFunctionToExecuteRegardless()
    }
    
    future.whenFulfilled(on: .main) { someType in
        // Success
    }
    
    future.whenRejected(on: .main) { error in
        // Error
    }

    To create your functions returning a Future<T>, you create a new pending promise, and resolve it when appropriate.

    func performAsynchronousWork() -> Future<String> {
        let promise = Promise<String>()
    
        DispatchQueue.global().async {
            promise.fulfill(someString)
    
            // If error
            promise.reject(error)
        }
    
        return promise.future
    }

    You can also use shorthands.

    promise {
         try jsonDecoder.decode(SomeType.self, from: data)
    } // Future<SomeType>

    Or shorthands which you can return from asynchronously.

    promise(String.self) { completion in
        /// ... on success ...
        completion(.fulfill("Some string"))
        /// ... if error ...
        completion(.reject(anError))
    } // Future<String>

    Documentation

    The complete documentation can be found here.

    Getting started

    Futures can be added to your project either using Carthage or Swift package manager.

    If you want to depend on Futures in your project, it’s as simple as adding a dependencies clause to your Package.swift:

    dependencies: [
        .package(url: "https://github.com/davidask/Futures.git", from: "1.6.0")
    ]

    Or, add a dependency in your Cartfile:

    github "davidask/Futures"
    

    More details on using Carthage can be found here.

    Lastly, import the module in your Swift files

    import Futures

    Contribute

    Please feel welcome contributing to Futures, check the LICENSE file for more info.

    Credits

    David Ask

    Visit original content creator repository https://github.com/davidask/Futures
  • eventex

    Eventex, Android Express Events

    Android library to send/post data to Fragments, Layouts, Activity. No need to create interfaces and pass listeners to multiple classes. There is also no need to subscribe/unsubscribe for events!

    Try It Now

    Make sure Java 8 (1.8) support is enabled in the gradle file

        compileOptions {
            sourceCompatibility JavaVersion.VERSION_1_8
            targetCompatibility JavaVersion.VERSION_1_8
        }
    

    Add EventEx to the project gradle file (Androidx based projects)

    implementation 'dev.uchitel:eventex:2.1.0'
    

    Or for Android Support Library projects

    implementation 'dev.uchitel:eventex-support:2.0.0'
    

    Simple

    To post message

    new UIEvent("button.ok.click").post(view); // yes, this is it

    To receive message. In any class that extends Fragment, ViewGroup, or Activity

    public class CustomFragment extends Fragment implements UIEventListener {
    //  .....
        @Override
        public boolean onMessage(@NonNull UIEvent uiEvent) {
            switch (uiEvent.what) {
                case "button.ok.click":
                    Log.d(uiEvent.toString());
                    return true; // to stop message propagation
            }
            return false;   // to let other objects to process message
        }
    }

    No need to setOnItemClickListener in the RecyclerView.Adapter! Much less boilerplate code compare to classic solution Communicate with other fragments! Class CustomFragment extends Android class Fragment. It will also work well if the class extends Activity, ViewGroup, or any layout derived from ViewGroup (LinearLayout, FrameLayout, etc..)

    Features

    • Delivers messages between UI components of an Activity.
    • Supports synchronous and asynchronous communication.
    • No need to subscribe/unsubscribe to receive messages.
    • Can deliver any data type.
    • Completely decouples components.
    • No reflection and no ProGuard rules.
    • Tiny code size.

    More Details

    Message can be sent synchronously

    new UIEvent(12345).send(viewGroup);

    Message can carry additional integer, string value, and anything that can fit into Bundle:

    new UIEvent(12345)
        .setText("some text to pass with message")
        .setNumber(9876) // some integer to pass with message
        .putAll(bundle)
        .post(viewGroup);

    Next code will properly receive this message:

    public class FragmentReceiver extends FrameLayout implements UIEventListener {
    //  .....
        @Override
        public boolean onMessage(@NonNull UIEvent uiEvent) {
            switch (uiEvent.code) {
                case 12345:
                    Log.d("FragmentReceiver", "text="+uiEvent.getText());
                    Log.d("FragmentReceiver", "number="+uiEvent.getNumber());
                    return true; // to stop message propagation
            }
            return false;   // to let other components to process the message
        }
    }

    Class UIEvent isn’t ‘final’ and can be extended to carry any data. See sample CustomUIEvent.

    Message can use integer ID, string ID, or both for more complex control scenarios:

    new UIEvent(12345, "button.ok.click"))
        .post(view);

    The ‘onMessage’ for the above code:

    public class FragmentReceiver extends Activity implements UIEventListener {
    //  .....
        @Override
        public boolean onMessage(@NonNull UIEvent uiEvent) {
            switch (uiEvent.code) {
                case 12345:
                    if(uiEvent.what.equals("button.ok.click")){
                        // ...
                        return true; // to stop message propagation
                    }
            }
            return false;   // to let other components to process the message
        }
    }

    When writing android library make sure to use ‘namespace’ to prevent collisions. Sending message inside library can look like:

    new UIEvent("button.ok.click")
        .setNamespace("lib_name.company_name.com")
        .post(view);

    Namespace “lib_name.company_name.com” is going to prevent ID collisions when the library is distributed to third party developers.

    And to receive this message inside library module

    public class FragmentReceiver extends Fragment implements UIEventListener {
    //  .....
        @Override
        public boolean onMessage(@NonNull UIEvent uiEvent) {
            // return false if this is not library message
            if (!uiEvent.getNamespace().equals("libname.company.com")) return false;
    
            switch (uiEvent.what){
                case "button.ok.click":
                    Log.d(uiEvent.getText());
                    return true; // to stop message propagation
            }
            return false;   // to let other objects to process message
        }
    }

    Requirements

    • Android 4.1.0(API 16) or above.
    • Java 8

    R8 / ProGuard

    No special requirements for R8 or ProGuard

    Do you think it might be useful? Help devs to find it.

    Alternative libraries

    License

    Copyright 2019 Alexander Uchitel
    
    Licensed under the Apache License, Version 2.0 (the "License");
    you may not use this file except in compliance with the License.
    You may obtain a copy of the License at
    
       http://www.apache.org/licenses/LICENSE-2.0
    
    Unless required by applicable law or agreed to in writing, software
    distributed under the License is distributed on an "AS IS" BASIS,
    WITHOUT WARRANTIES OR CONDITIONS OF ANY KIND, either express or implied.
    See the License for the specific language governing permissions and
    limitations under the License.
    
    Visit original content creator repository https://github.com/uchitel/eventex
  • Project-4-Data-Lake-with-AWS-EMR

    Data Lake

    Introducion

    A music streaming startup, Sparkify, has grown their user base and song database even more and want to move their data warehouse to a data lake. Their data resides in S3, in a directory of JSON logs on user activity on the app, as well as a directory with JSON metadata on the songs in their app.
    We will build an ETL pipeline that extracts their data from S3, processes them using Spark, and loads the data back into S3 as a set of dimensional tables.

    Project Datasets

    You’ll be working with two datasets that reside in S3. Here are the S3 links for each:

    Song data: s3://udacity-dend/song_data
    Log data: s3://udacity-dend/log_data

    Log data json path: s3://udacity-dend/log_json_path.json

    Song Dataset

    The first dataset is a subset of real data from the Million Song Dataset. Each file is in JSON format and contains metadata about a song and the artist of that song. The files are partitioned by the first three letters of each song’s track ID. For example, here are filepaths to two files in this dataset.

    song_data/A/B/C/TRABCEI128F424C983.json song_data/A/A/B/TRAABJL12903CDCF1A.json

    And below is an example of what a single song file, TRAABJL12903CDCF1A.json, looks like.
    {“num_songs”: 1, “artist_id”: “ARJIE2Y1187B994AB7”, “artist_latitude”: null, “artist_longitude”: null, “artist_location”: “”, “artist_name”: “Line Renaud”, “song_id”: “SOUPIRU12A6D4FA1E1”, “title”: “Der Kleine Dompfaff”, “duration”: 152.92036, “year”: 0}

    Log Dataset

    The second dataset consists of log files in JSON format generated by this event simulator based on the songs in the dataset above. These simulate activity logs from a music streaming app based on specified configurations.
    The log files in the dataset you’ll be working with are partitioned by year and month. For example, here are filepaths to two files in this dataset.

    log_data/2018/11/2018-11-12-events.json
    log_data/2018/11/2018-11-13-events.json

    And below is an example of what the data in a log file, 2018-11-12-events.json, looks like.

    Log data file

    Schema for Song Play Analysis

    Using the song and log datasets, you’ll need to create a star schema optimized for queries on song play analysis. This includes the following tables.

    Fact Table

    1.songplays – records in log data associated with song plays i.e. records with page NextSong

    • start_time, user_id, level, song_id, artist_id, session_id, location, user_agent
    Dimension Tables

    2.users – users in the app

    • user_id, first_name, last_name, gender, level

    3.songs – songs in music database

    • song_id, title, artist_id, year, duration

    4.artists – artists in music database

    • artist_id, name, location, latitude, longitude

    5.time – timestamps of records in songplays broken down into specific units

    • start_time, hour, day, week, month, year, weekday

    Project Template

    In addition to the data files, the project workspace includes six files:

    1.etl.py reads data from S3, processes that data using Spark, and writes them back to S3.
    2.dl.cfg contains your AWS credentials.
    3.README.md provides discussion on your process and decisions.

    Project Steps

    1.Implement the logic in etl.py to load raw data from given S3 buckets to create new tables using spark.
    2.Implement the logic in etl.py to load new tables to in parquet format on S3.
    3.Create the AWS EMR cluster with spark as processing engine and hdfs as storage in AWS. 4.Copy the etl.py file on hdfs and run it using spark-submit command. Please remove the config related code as it is not required to run this file on EMR, else it will give errors.
    5.Check the output S3 bucket for output.
    6.Delete your Amazon EMR when finished.

    The song play data model is as follows Song ERD file

    Visit original content creator repository https://github.com/NitinSPatil15/Project-4-Data-Lake-with-AWS-EMR
  • blacksheep-prometheus

    Blacksheep Prometheus

    Build Status codecov Package Version PyPI Version

    Introduction

    Prometheus integration for Blacksheep.

    Requirements

    • Python 3.7+
    • Blacksheep 1.0.7+

    Installation

    $ pip install blacksheep-prometheus

    Usage

    A complete example that exposes prometheus metrics endpoint under default /metrics/ endpoint.

    from blacksheep.server import Application
    from blacksheep_prometheus import use_prometheus_metrics
    
    app = Application()
    use_prometheus_metrics(app)

    Options

    Option name Description Default value
    requests_total_metric_name name of metric for total requests 'backsheep_requests_total'
    responses_total_metric_name name of metric for total responses 'backsheep_responses_total'
    request_time_seconds_metric_name name of metric for request timings 'backsheep_request_time_seconds'
    exceptions_metric_name name of metric for exceptions 'backsheep_exceptions'
    requests_in_progress_metric_name name of metric for in progress requests 'backsheep_requests_in_progress'
    filter_paths list of path’s where do not need to collect metrics []

    Custom metrics

    blacksheep-prometheus will export all the prometheus metrics from the process, so custom metrics can be created by using the prometheus_client API.

    Example:

    from prometheus_client import Counter
    from blacksheep.server.responses import redirect
    
    REDIRECT_COUNT = Counter("redirect_total", "Count of redirects", ("from_view",))
    
    async def some_view(request):
        REDIRECT_COUNT.labels(from_view="some_view").inc()
        return redirect("https://example.com")

    The new metric will now be included in the the /metrics endpoint output:

    ...
    redirect_total{from_view="some_view"} 2.0
    ...
    

    Contributing

    This project is absolutely open to contributions so if you have a nice idea, create an issue to let the community discuss it.

    Visit original content creator repository https://github.com/Cdayz/blacksheep-prometheus
  • tigase-testsuite

    Tigase Monitor screenshot

    Tigase Logo Build Status

    Tigase Testsuite [deprecated]

    XMPP funcional test framework with sizeable suite of tests, currently superseeded by Tigase TTS-NG

    Current results for Tigase XMPP Server can be found on our pages: Stable and Snapshot releases

    Features

    • Over 200 funcional XMPP tests:
      • Core XMPP (legacy socket and BOSH)
      • MultiUserChat
      • PubSub
      • Admin ad-hoc
    • Easy, automatic operation
    • Easy way to add more tests cases
    • (Optional) Automatic preparaion of the database, supports:
      • MySQL
      • PostgreSQL
      • Derby
      • MongoDB
      • MS SQL Server

    How to Start

    Running

    The whole suite execution can be handled via $ ./scripts/all-tests-runner.sh shell script. Executing it without any parameters will yield help:

    $ ./scripts/all-tests-runner.sh
    Run selected or all tests for Tigase server
    ----
    Author: Artur Hefczyc
    ----
      --help|-h	This help message
      --func [mysql|pgsql|derby|mssql|mongodb]
                  Run all functional tests for a single database configuration
      --lmem [mysql|pgsql|derby|mssql|mongodb]
                  Run low memory tests for a single database configuration
      --perf [mysql|pgsql|derby|mssql|mongodb]
                  Run all performance tests for a single database configuration
      --stab [mysql|pgsql|derby|mssql|mongodb]
                  Run all stability tests for a single database
                  configuration
      --func-all  Run all functional tests for all database
                  configurations
      --lmem-all  Run low memory tests for all database
                  configurations
      --perf-all  Run all performance tests for all database
                  configurations
      --stab-all  Run all stability tests for all database
                  configurations
      --all-tests Run all functionality and performance tests for
                  database configurations
      --single test_file.cot
      --other script_file.xmpt
    ----
      Special parameters only at the beginning of the parameters list
      --debug|-d                 Turns on debug mode
      --skip-db-relad|-no-db     Turns off reloading database
      --skip-server|-no-serv     Turns off Tigase server start
      --small-mem|-sm            Run in small memory mode
    -----------
      Other possible parameters are in following order:
      [server-dir] [server-ip]

    You should copy scripts/tests-runner-settings.dist.sh to scripts/tests-runner-settings.sh and adjust settings before running.

    Adding new tests

    To add new test you should create new test-case .cot file (it contains set of stanzas that are being send to server and expected results) and save it under tests/data. Subsequently you can run it using --single parameter.

    Additionaly, you can create .xmpt file, which can group various test cases into suites, helping with variables substitions.

    Please refer to Tigase Development Guilde: Tests for details.

    Support

    When looking for support, please first search for answers to your question in the available online channels:

    If you didn’t find an answer in the resources above, feel free to submit your question to either our community portal or open a support ticket

    Compilation

    It’s a Maven project therefore after cloning the repository you can easily build it with:

    mvn -Pdist clean install

    License

    Tigase Tigase Logo Official Tigase repository is available at: https://github.com/tigase/tigase-testsuite/.

    Copyright (c) 2004 Tigase, Inc.

    Licensed under AGPL License Version 3. Other licensing options available upon request.

    Visit original content creator repository https://github.com/tigase/tigase-testsuite